 Automatic washing machines are among the things that modern people use almost without thinking. Difficulties can arise when outdated units are replaced with more modern options. After all, it is necessary to make several connections at once - to the drainage system, the cold water main, as well as to the electrical network. Following standard instructions will allow you to solve such a problem as connecting a washing machine to a sewer with minimal losses.
Let's start with preparation
First you need to choose a place that will be ideal to install the structure.
The following factors should be considered when the buyer undertakes installation:

- So that installation and further operation do not cause any problems.
- The floor covering where the device is installed should be as smooth as possible.
- Compliance with the surrounding interior.
- Close proximity to water supply, sewerage and electricity. Then household appliances are connected with less hassle.
Users often argue about where such devices should be located.Some say that the best place to connect will be the kitchen. Others prefer the option with bathrooms.
But some city apartments don't have bathtubs large enough. Then the device can be placed under the sink. The main thing is to take care of taking measurements in advance, so as not to miss the dimensions later.
Experts also have their own points of view regarding suitable installation options:
- Bathrooms with tiles and easy access to all communications are standard.
- The kitchen is also an acceptable solution to save available space. But this is the only plus in this case.
- The structure is installed in the hallway only when absolutely necessary. True, here it is no longer possible to do without additional laying of appropriate communications. Connecting to the water supply system will be somewhat problematic.
First you need to start removing the following parts of the structure:
- Safety brackets.
- Wooden bars for spreading.
- Transport bolts.
The instructions usually write about how to unlock household appliances.
Connecting the machine
If the owner is at least a little versed in technology, then connecting should not be a hassle. Minimal knowledge of handling pipes and transition parts is sufficient. If at least part of the work looks complicated, it is recommended to contact specialists.
Connecting the device to the sewer
At first glance, the process seems simple, but this is a misconception. Each option has its own nuances.
The connection itself is carried out in two ways:
- Temporary. Then the drain hose is simply lowered into the bathroom or toilet. Suitable if the bath is combined with a toilet.
- Stationary. Here a connection to the sewer is already required. It is this option that causes the most difficulties.
When connecting a washing machine to the sewer, buyers must consider the following requirements and restrictions:
- Long drain hoses are not allowed. Otherwise, the pumps experience increased loads. Because of this, the device fails prematurely.
- There will be no unpleasant odors inside the machine when the drain is connected to the siphon. This is the main advantage of such solutions.
The sink siphon must be connected to the drain hose. Only in this case is the tightness of the connection ensured.
How to connect to the water supply?
The main thing is that when performing such work you do not have to then extend the hose with fittings supplied by the manufacturer.

Let's look at how the connection is made with a separate valve or a special end valve.We will also need to take mortise clamps, which have a guide bushing, as well as a rubber gasket, or a tee. Otherwise, connecting the washing machine to the sewer will be impossible.
The scheme of actions is described as follows:
- The water pipe with the clamp are screwed together. The bushing should be on the outside.
- Use a drill to drill the pipe. After this, the connection is made with pipe sections or clamps. If the latter is used, then the end valve is installed.
- On one of the pipe ends, we create the same thread as the clamp.
- FUM tape or seals are used to close the thread from the outside.
- The end valve must be screwed onto the outer pipe, with some effort. The washing machine hose is attached to the second end.
- The end of the hose is connected to the machine itself.
- We check everything for the presence or absence of leaks.
When making a connection, you cannot do without taking into account some nuances:
- If there is a possibility of mechanical damage somewhere, you should refuse to install it in these places.
- It is unacceptable to stretch the hose, even the slightest. Otherwise, when the speed is maximum, due to the vibration of the machine, this part is subject to strong deformation. It is important to ensure that the hose is located inside as freely as possible.
- 100% tightness must be ensured for all parts.
- The filter is installed before the entrance of the machines. This ensures that small particles with rust are removed. Due to this, the unit will last longer.
If you meet the above requirements, the floor in the room will always be dry, even when water is poured.
Power connection: some nuances
Washing machines are units that consume large quantities of energy. Typically this figure is 1.5-2.5 kW. The main thing is to comply with all safety requirements, because the device is constantly in contact with water.
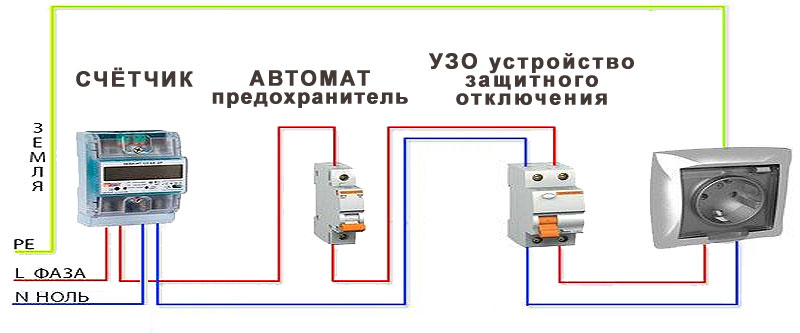
Connection diagram for a washing machine with protection in the form of a machine and an RCD
Separate wiring is required in situations where previously only aluminum wires were used in the apartment. We will need to supplement the system with copper varieties, which have three cores with a cross-section of 1.5 square millimeters.
They must have the following properties:
- Three layers of insulation.
- Good rigidity.
- A design that is convenient to install inside walls.
The household appliance must be plugged into a separate outlet that is maximally protected from moisture. The optimal choice is products with high protection indices. The outlet must be connected using a separate switch. The minimum rating level is 25 A.
When taking a shower, it is advisable to unplug the machine so that the owner does not get an electric shock.
The lack of grounding leads to the fact that in the event of any malfunction, the likelihood of electric shock increases.
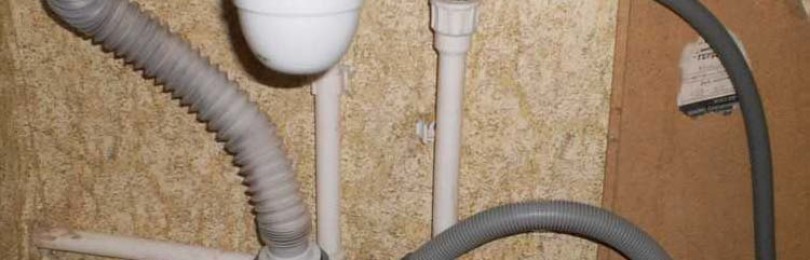
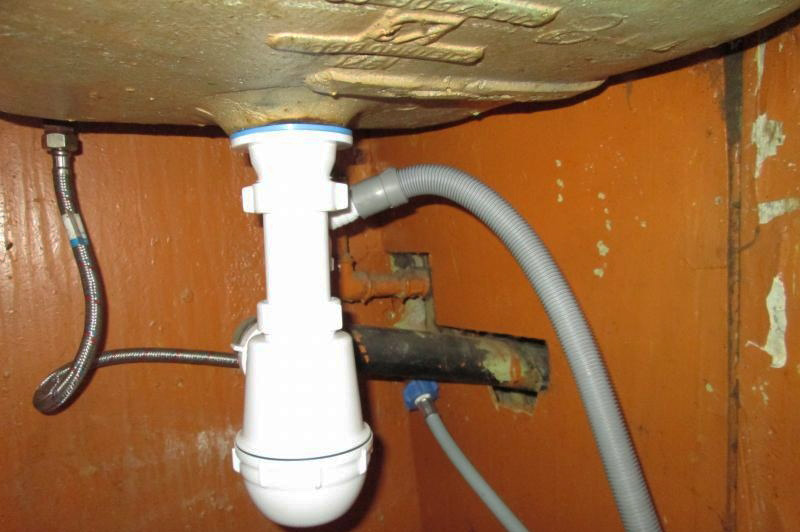
Correct installation of the siphon
Buyers often think about how to connect a machine with a siphon, which model to use for maximum effect. The ideal option is when the siphon is equipped with a special pipe for connecting the hose involved in draining the water.
The first stage is connecting to the neck at the sink. The position of the device should be vertical, not horizontal.If you do not follow this rule, then there is a high probability of leakage.
Not the least important factor is the position and the height of the connection. The drain hose must be at a height of at least 60 centimeters from the location of the back cover.
But the drain system can be installed lower. Back covers in the upper part are usually equipped with special fasteners. The hose itself can be connected to this part.
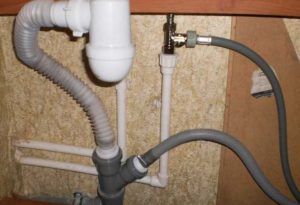
Experts say that systems should not be tightened too much. Partial backflow of dirty liquid can be eliminated due to the presence of gaps. But this does not always work, so it is still recommended to ensure complete tightness of the system. A special valve is used to prevent backflow. After installing it, you just need to turn on the tap to check the reliability of the connection.
The next step is to connect the drain hose itself. A cuff or adapter will become indispensable assistants when performing this action. When there is no cuff, then in order to increase the tightness, we tighten the adapters with a clamp where the connection is made. Buyers are faced with siphons built into the surface of the walls.
The automatic machine can be connected directly if the owner does not want to use a siphon.
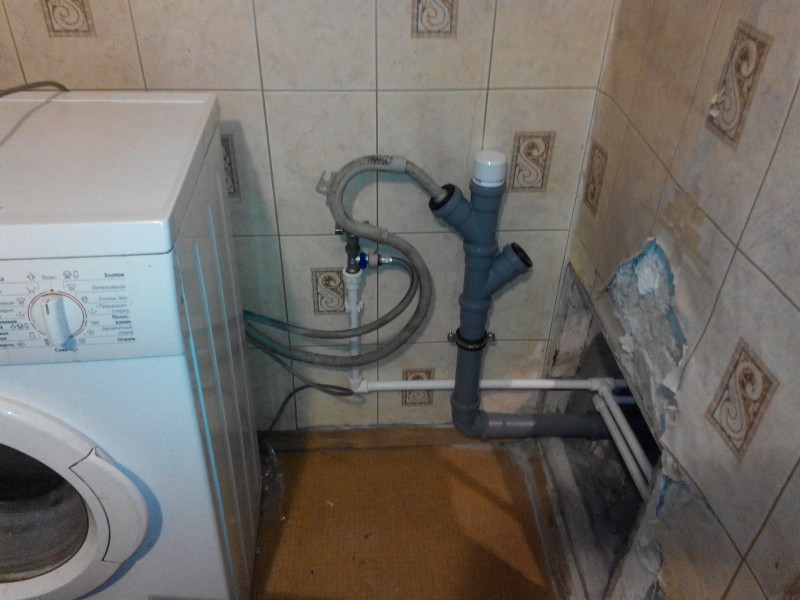
About connection without using a siphon
Direct connection to the sewer is a simple process.The main thing is not to forget about compliance with height requirements and the use of a suitable tee. The diameter of the tees is at least 50 millimeters. Installation is carried out inside the socket, which is supplied with plastic sewer pipes.
Installation of tees on a plastic, polyethylene base is carried out as follows:
- We take out the old siphon.
- We insert adapters.
- We are installing the tee itself.
There should be no problems installing such systems in the bathroom. You just need to adhere to the following recommendations:
- We lower the hose into the tube.
- We carry out fixation.
- We connect the parts with maximum tightness.
Unpleasant odors from the sewer will penetrate into the room if sealing is not enough.
It’s not for nothing that the covers on the back are equipped with additional fasteners. This is done for hoses whose location is higher than the outlet. The correct position of the device and its parts ensures that there is no backwash of dirty water. If the cover does not have a corresponding fastener, then you need to bend it yourself so that the hose becomes like the letter S.
Casting involving contaminated water is more likely to occur with a straight hose. Then the laundry will suffer, even if it is washed well. The main thing is to ensure that the position of the hose is correct.
To improve sealing, it is recommended to choose high-quality conductors. The same steps described above will need to be performed when the hose is replaced with a new one. The back cover must be removed before the design is completely changed to an analogue one.
Connection: what height should it be?
Height requirements must also be observed when connecting.Exhaust pumps are supplied with limited power. The pump is located near the machine itself, at a height of at least 80 centimeters. It should be located at a distance of 60 centimeters or more from the sewer.
Conclusion
There are many options for connecting the washing machine to the sewer and water supply. Everyone chooses what best suits their financial capabilities and current needs. The main thing is to act carefully and ensure that the seal is maintained.