
The washing machine is the household appliance that is most susceptible to rapid wear and tear. Repairing it is not a cheap pleasure, and not everyone can afford to pay for the services of a master. Most often, the bearing assembly fails, which is why it is so important to know how to replace the bearing in a washing machine with your own hands.
What is a bearing and why is it needed?
People without the appropriate skills and experience may not notice such a small part as a bearing, since it is not visible during a visual inspection. Despite this, the bearing is an important part that supports the shaft. In other words, it holds the shaft so that it does not stop rotating. The entire load falls on the bearing, where it transfers it to other components.
Number and location of bearings in the washing machine
If the bearing assembly is in good working order, household appliances operate quietly and hardly vibrate. Standard models have 2 bearings: internal and external. They are located at the rear of the drum, and the main task of the parts is to ensure uniform, smooth and silent rotation of the shaft in the seat. The first sign of a part malfunction is a characteristic sound during operation of household appliances, which makes it clear that the bearing is broken.
Causes of bearing failure
Bearing malfunction occurs when the washing machine is used incorrectly, natural wear of internal parts, or mechanical damage. If a breakdown is detected, you need to find out its cause in order to correctly replace it:
- Worn oil seal. Its wear causes water to leak during washing, causing moisture to destroy the bearing.
- Violation of the rules for installing a washing machine. During installation, a number of rules must be followed. Before the first wash, the transport bolts are unscrewed, the equipment is fixed on a flat floor and then connected to the power supply and water supply, according to the attached instructions.
- Constant tank overload. Drum overload with dirty laundry
leads to increased stress on the bearing. High load causes destruction of the element.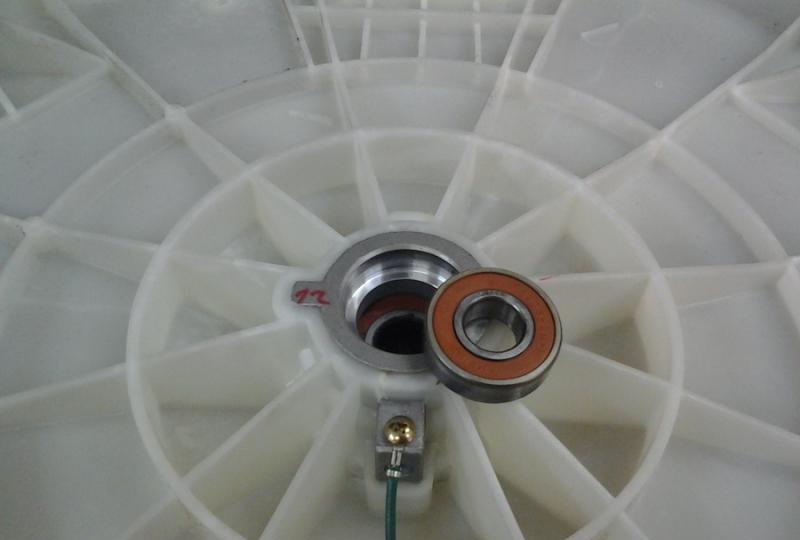
How to determine that it is time to change the bearings?
A broken bearing in the drum is a fairly common problem. This is due to the fact that the part is subjected to heavy loads during the transition to any operating mode of the washing machine, which leads to a rapid end of its service life. It is not immediately possible to determine the breakdown of the bearing unit. Most often, the problem becomes obvious when the equipment simply stops working.
In fact, it is quite easy to determine whether the bearings are working properly, for this you need to:
- Listen to the operation of the equipment. The first sign of wear is an unusual sound that appears during operation, it is especially clearly heard when the spin cycle begins, as the engine speed becomes faster. The unit may suddenly start making noise, so it is so important to immediately pay attention to the presence of a characteristic sound. It will not go away on its own, and with each start the equipment will creak more clearly, especially when using other modes. If nothing is done, the bearing will eventually fail completely, and the drum will simply jam. True, the rubber seal will break much earlier, which is why the bearing and then the floor can be filled with water.
- When the equipment is operating, strong vibration is felt. Over time, vibration will be added to the characteristic sound, again when using another mode. This can lead to the equipment moving on a flat floor. If you hold the unit with your hands during the process, you can feel strong jolts and impacts.
- The spin has stopped working. The bearings are pressed in at the factory, so they cannot come out of the seat on their own.The engine no longer receives additional resistance from a broken bearing, which is why when the next mode is turned on, the equipment simply stops working, and further operation becomes impossible.
Unstable drum. The easiest way to recognize a problem is to open the door and turn the drum by hand. If you hear rubbing sounds or the drum rotates unevenly, the bearing most likely needs replacing.
What happens if a faulty bearing is not replaced?
A broken bearing is always unpleasant, since it is quite difficult to replace it, but, nevertheless, it must be done. The consequences can lead to serious problems if measures are not taken in time:
- The bearing seat will break and you will have to install a new drum.
- The electric motor will burn out and will have to be replaced.
- The belt drive may break.
- The units responsible for transmitting the rotational motion of the electric motor shaft to the drum of the washing machine may fail.
- The integrity of the tank will be compromised, this is especially true for equipment where it is made of plastic. Water may leak, the electronic control system may be damaged, but the most unpleasant thing is that you will flood your neighbors.
Selection of bearings for machines from different manufacturers
The most common question from users faced with the need to replace an old bearing with a new one is which is better. But first, you should know that even the highest quality part will quickly fail if it is selected incorrectly: the load is calculated inaccurately, the technical characteristics and design are not designed for specific operating conditions.
Therefore, before you start purchasing, decide on the size of the required bearing, its performance properties, and resistance to aggressive environments. There are several factors that will help determine the quality of a bearing:
- Package. There should be no damage, poorly visible or uneven inscriptions on it.
- The product must be accompanied by a technical passport indicating important information, information about the manufacturer, country of manufacture, date of manufacture and the characteristics of the model itself.
- A denial of a warranty is a serious cause for concern. Any company that values its reputation provides a guarantee for its product.
- The body of the spare part must not have any defects. Scratches, chips, rust are clear signs of a low-quality product.
- Pay attention to the manufacturer of the spare parts. Find out its history, how long the company has been on the market, how bearings are made. Often, large brands do not hide such information; it can be found in open sources.
Popular domestic brands for the production of bearings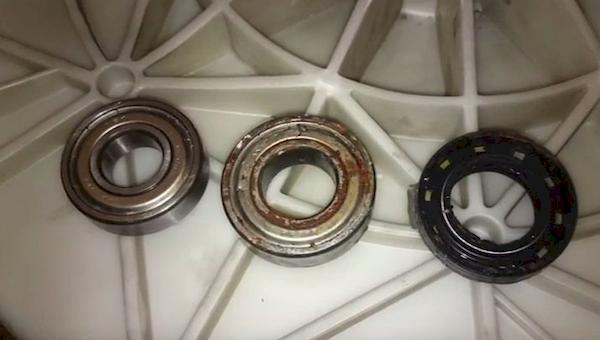
These include:
- SPZ-Group - adapted to work in difficult conditions.
- LADA - have high endurance.
- TRIALLI - popular among users.
- VBF - produces high-quality parts.
- Volzhsky standard - are highly resistant to various types of loads.
The best foreign bearing manufacturers
The most popular foreign manufacturers include:
- SNR are known for high quality products.
- SKF - they are most often chosen by buyers.
- INA - (FAG) best value for money.
- NSK - do not make noise during operation.
- KOYO are reliable.
Preparing the tools needed to replace bearings in the washing machine
If you find a bearing assembly that is damaged, you need to replace it as quickly as possible. It is quite difficult to do this on your own; first you need to prepare the necessary tools. Starting work without preparing means delaying the repair process for more than one day.
You will need:
- hammer;
- pliers;
- wrench;
- Phillips slotted and screwdrivers;
- silicone sealant;
- a metal pin, which can, if necessary, be replaced with a chisel, with a diameter of up to 0.5 cm.
And, of course, do not forget the necessary replacement parts. It is most practical to buy a complete set at once, which includes large and small bearings, as well as a rubber seal. You don’t have to take the broken part with you to the store; just write down the number. Most often, a plate with the necessary information is located on the back of the washing machine.
Replacing a bearing in a front-loading washing machine
Before starting repairs, the equipment is disconnected from the power and water supply networks, and any things are removed from its surface. Since it is often impossible to move the machine from the bathtub to a more convenient place for work, it is important to prepare containers in advance where tools and parts for repair will be stored. If you are not sure that you can put the unit back together, take pictures or write down any action you perform.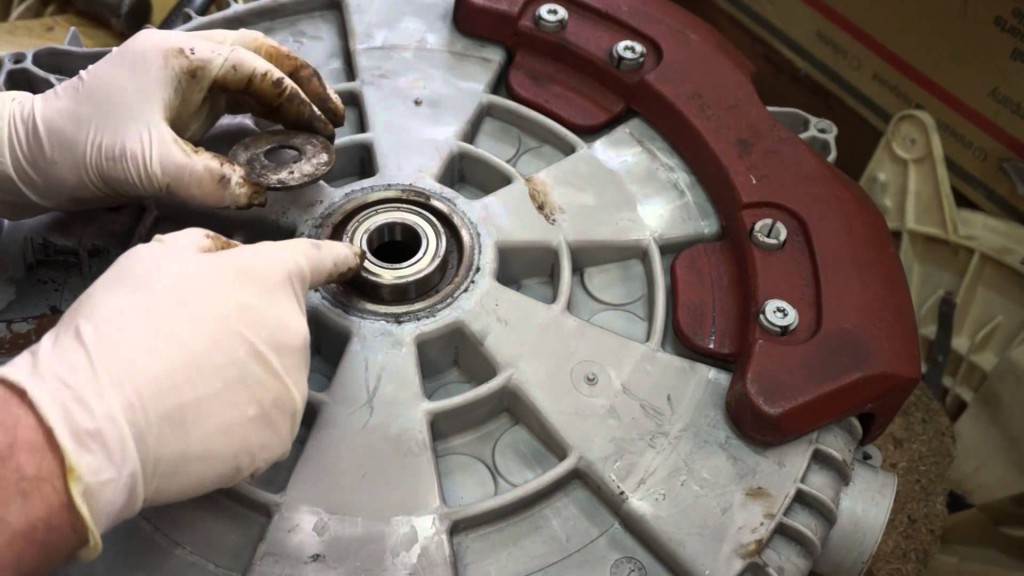
Step-by-step disassembly of the washing machine
Front-loading washing machines are distinguished by the fact that two identical bearings are installed on the axle at the edges of the drum. To replace, you need to disassemble the equipment in the following order.
Cover on top
It is dismantled first. The top cover is secured to the far wall with self-tapping screws, which can be removed.To remove the cover, it must be moved, then it will not be used until the end of the repair. Just put the cover in a place where it will not interfere with your work. Then remove the dispenser, or in other words, the compartment where the laundry detergent is poured. To do this, simply press the latch. The next step is to remove the control panel, simply unscrew the screws.
Removing the Front and Rear Panels
An elastic band is put on the rim of the tank and the front panel, which is securely secured with a clamp. It can be removed using pliers or a slotted screwdriver, depending on the model of equipment. The spring is carefully pryed off with tools, then the clamp is pulled out. Once the cuff is removed, it is separated from the front of the body and tucked inside.
Now it's time for the hatch blocking device. To do this, you need to unscrew two screws, insert your hand between the cuff and the wall and disconnect the lock. All that remains is to remove the remaining fastenings: the front panel and the back cover.
This will provide access to the control element, which is not so easy to detach.
To do this carefully, remove the chips with wires from the sockets, so as not to get confused, mark them with a marker.
The bottom panel is removed by pressing a flat object onto the latches located on the side.
Tank tops
Hidden under the top panel is the dispenser and control panel, which were removed earlier. Now, in order to dismantle the top panel, you need to unscrew the screws and remove it. When you remove the clamp, the coupler is also pulled out; make sure you have a dry rag in advance, there may still be liquid in it. Next, disconnect all the wires that go to the heating element.The wires are secured with ties and wire, which are also disconnected at the junction with the tank. The wires from the engine are also disconnected.
Front part disassembly
The next step is to remove the tank, so first unscrew the counterweights, which are located in the front and rear parts of the washing machine. This will make the tank easier to reach. Having disconnected the pipe to the water sensor, begin to remove the shock absorbers. Use a wrench to remove the bottom bolts.
Now the tank is held only by springs, and now its position is very unstable. Therefore, do not forget to hold it from below. To remove the part, simply unscrew the springs, remove the belt, remove the engine and shock absorbers. Now you can begin to directly disassemble and replace it.
Disassembling the tank
To make working more comfortable, place the part on the table. The next step is to divide the tank in half, that is, into two parts. To do this, remove the cuff, but do not forget to leave a mark so that you can easily put it back later. Secure the pulley to one bolt, then press the shaft into the tank, this can be done using a rubber hammer. One part of the tank is held on by latches and screws, so unscrew them. Visually inspect the crosspiece, shaft and other parts for damage. A faulty bearing, having worked for a long time in this condition, could also affect the operation of other parts. If a problem is found, they are also replaced.
Replacement of bearings and assembly of washing equipment
You can knock out the clip of the old spare part from the drum of the device with a hammer and a rod. It should move in a crosswise direction away from the broken part, and it should be hit with a hammer.This way you will knock the part out of its installation location: the large one on the outside of the tank, the small one on the inside.
After the faulty bearings are removed, the places where they were installed are thoroughly cleaned, since a large amount of dirt has probably accumulated there over the years of operation. Installation of new spare parts starts with the smallest ones. Using the same method as before removal, drive the bearing into its new installation location. It must go in all the way until the blows on it become loud. The second bearing is installed in the same way. Upon completion of work, lubricate the oil seal and return it to its place. Proceed with caution as this is a fragile part. Reassembling the washing machine is done in the reverse order.
Replacing a bearing in a top-loading washing machine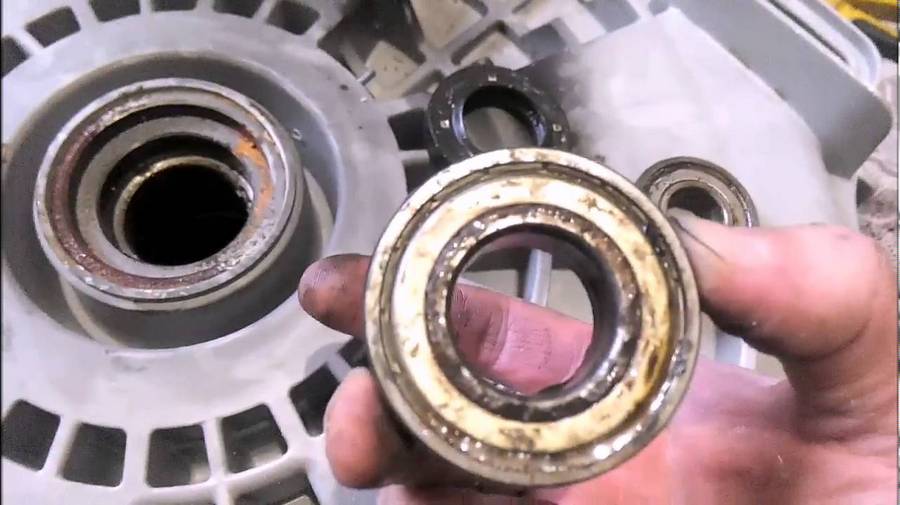
Installing a faulty spare part in top-loading machines is much easier. In such washing machines, the motor and other important parts cannot be removed. The main feature is that the drum is mounted on two axle shafts, and not on one. Then it is necessary to replace the bearing on two axle shafts at once, regardless of which bearing is broken. The work steps are as follows:
- The outer and rear panels are removed.
- It is necessary to disconnect all electrical wires and remove hoses, as they will only get in the way.
- The linings that are installed on the sides of the drum are removed.
- The bearing without the pulley must be replaced first.
- The places where the parts will be installed are cleaned and lubricated.
- The machine is assembled in the reverse order.
Features of bearing replacement in washing machines from different manufacturers
Repairs for different models may differ, so you need to know some design features.
Indesit
When starting to repair equipment from an Italian brand, check the design of the tank, since it differs for different models. In new technology, the tank is non-separable, but in older models it can be disassembled. In addition, the pulley mounting screws may have a left-hand thread, which also needs to be clarified. The Indesit technology has one feature - it is a double fastening of the drum axis and the presence of a self-positioning sensor, which also turns off when removed.
LG
The equipment from the manufacturer from South Korea differs in that the tank is removed from the front of the equipment body. Washing machines of this brand have improved characteristics that allow you to wash a large volume of laundry in one load. Therefore, the tank is heavy, which complicates bearing repairs. In addition, during disassembly, pay attention to the mounting unit for the electric motor, since it has a different design compared to equipment from other manufacturers.
Samsung
This is also a South Korean company, where the tank is dismantled through the outer panel. Work on knocking out the bearing is carried out with extreme caution, since in the event of a breakdown the entire drum will have to be replaced. In addition, it is worth remembering that two bearings of different sizes are used on one shaft. The big one needs to be knocked out from the outside towards the tank, and the smaller one needs to be knocked out from the inside.
Atlant
For equipment from the Belarusian brand, the drum comes from the back. Since Atlant uses a collapsible tank, it does not need to be cut when replacing a part. During assembly, a sealant is used, which provides more reliable protection against possible leaks.
How to lubricate a bearing without disassembling the machine?
In some cases, when strange sounds are detected, simply lubricating the washing machine bearings is enough to get rid of them. Of course, here you need to know some nuances. If you decide to do the work yourself, then you need to take into account that the bearings and the oil seal require different lubricants. Often, bearings are lubricated without disassembling, only those with a metal seal washer. The principle of operation is to use a medical syringe or a tight-fitting sleeve with an internal piston, the diameter of which coincides with the outer diameter of the seal. It is necessary to create excess pressure of the lubricant, which will penetrate through the gap between the race and the seal. This method is quite labor-intensive and does not guarantee that there will be enough lubricant to get inside the broken device.
Required funds
To work you will need:
- Thin gloves so that fingers and the part are cleaned of dirt. For this purpose, the best choice would be disposable gloves; they are tonic and easy to use.
- Mat for protection against dirt. The easiest way is to take a small piece of cardboard, an old newspaper or a plastic stand.
- Good light. Often natural light is not enough, so it is recommended to use an additional light source.
Ball bearing grease or oil, if you don't have a narrow applicator, just use a small syringe.
Stages of work
Apply grease to the ball bearing using a syringe or, alternatively, use a grease reservoir. The amount of product your bearing needs depends on the type of machine itself and operating conditions. The thick lubricant provides extra seal and can be applied a little more. Stages of work:
- Gently press the seal washers onto the bearing with two thumbs using light pressure.
- Now remove excess grease with a paper towel.
- Keep the bearing firmly centered while rotating it on the outer ring to distribute the lubricant evenly.
What to do if the tank turns out to be non-separable?
Having taken the tank out of the machine, many users note that there are simply no screws that allow it to be unscrewed into two components. The whole catch is that today many modern washing machines go on sale with a non-separable tank. Prefabricated parts are most often installed in older devices. This can easily be explained by the fact that making a non-separable tank is much simpler and cheaper, since fasteners and screws are not used.
In addition, it is much more profitable for the manufacturer if customers, when a malfunction occurs, contact him to replace the entire spare part, and not just purchase its individual components. If you discover that the bearing is broken, and the service center offers to completely replace the washing machine tank, it may be worth looking for other repair specialists. The process of disassembling a solid tank is as follows:
- First, use a drill to make holes at a distance of 5 cm from each other where the weld seam goes.
- Then, using a hacksaw for metal, the tank must be carefully sawed along the seam made. Do everything carefully so as not to damage the part.
- Before assembling it into one piece, the edges of the tank are treated with silicone. The two parts are connected into one and bolted together using previously drilled holes.
Conclusion
Despite the fact that repairing an automatic machine is quite labor-intensive, if you have free time, it is easy to do it yourself.This way you will save money. But before you begin the analysis, sensibly assess your strengths. Remember that not every master will undertake to put back the machine you disassembled.


