
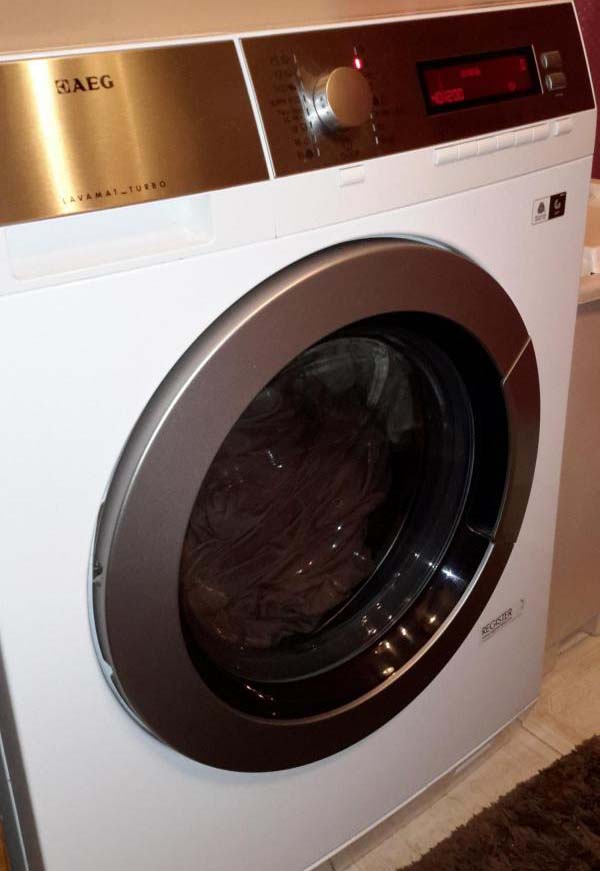
 Laundry washing machines from AEG are known to many as high-quality models made in Germany. These SMAs managed to win the recognition of Russian residents for their beautiful appearance, reliability, simplicity and functionality. But even such machines can break down, some simply from prolonged use. In such cases, it is necessary to repair the AEG washing machine, and a number of failures can be eliminated with your own hands.
Basic malfunctions of AEG washing machines
Failures of washing machines can be caused by violations of operating rules, manufacturing defects, and other circumstances. These factors can cause breakdowns, which include:
- the water does not drain, the machine does not wash;
- there is no heating of water, the process takes place in cold liquid;
- when turning the drum, an extraneous knock or grinding noise is heard;
- there is no water flowing into the drum of the machine;
- During the washing process, unnecessary noise is heard;
- knocks out automation, traffic jams, RCD;
- Water flows into the drum without interruption.
Self-diagnosis of the AEG washing machine
The machine is capable of independently generating error codes, which can be deciphered using the washing machine’s operating instructions. The most common failures that occur are:
- E 11 (C1) - this error indicates that water is not being filled into the tank.The reason must first be sought in the intake valve;
- E 21 (C 3 or C 4) – dirty water does not drain for a long time. The pump must have broken down, or the electronic module has failed;
- E 61 (C 7) – no water heating for a long time. In this case, the problem must be looked for in the heating element. Note that such an error is detected only in diagnostic mode;
- E 71 (C 8) - the resistance indicator of the temperature sensor does not correspond to the entered limits. This code confirms a breakdown of the sensor itself and, less often, of the water heating element;
- E 74 - the position of the temperature sensor has failed;
- EC 1 – inlet valve is blocked. Either he or the board responsible for controlling the entire washing machine could refuse;
- CF (T 90) – failure of the management board.
There are a sufficient number of codes embedded in the microprocessor by the manufacturer. Listed here are the ones that are highlighted more than others. Due to the fact that some error codes are issued only during diagnosis, let’s figure out how to do this:
- set the program task toggle switch to the “off” position, canceling the preset washing command, and turn off the power to the machine;
- simultaneously press and hold the “start/start” and “exit” buttons;
- turn on the machine, turn the programmer wheel one notch to the right;
- press the buttons from the second point again and hold them until the error code appears on the display.
Exiting the testing mode is easy - you need to turn off, turn on and turn off the washing machine again.
AEG washing machine repair
What to do if one of the listed problems is identified? There are two solutions to the problem - call an experienced technician or try to carry out the repair yourself.
- We repair the water heating element.
You can always replace a burnt-out heating element yourself. The best way to proceed is as follows:
- an original element corresponding to the AEG model is purchased;
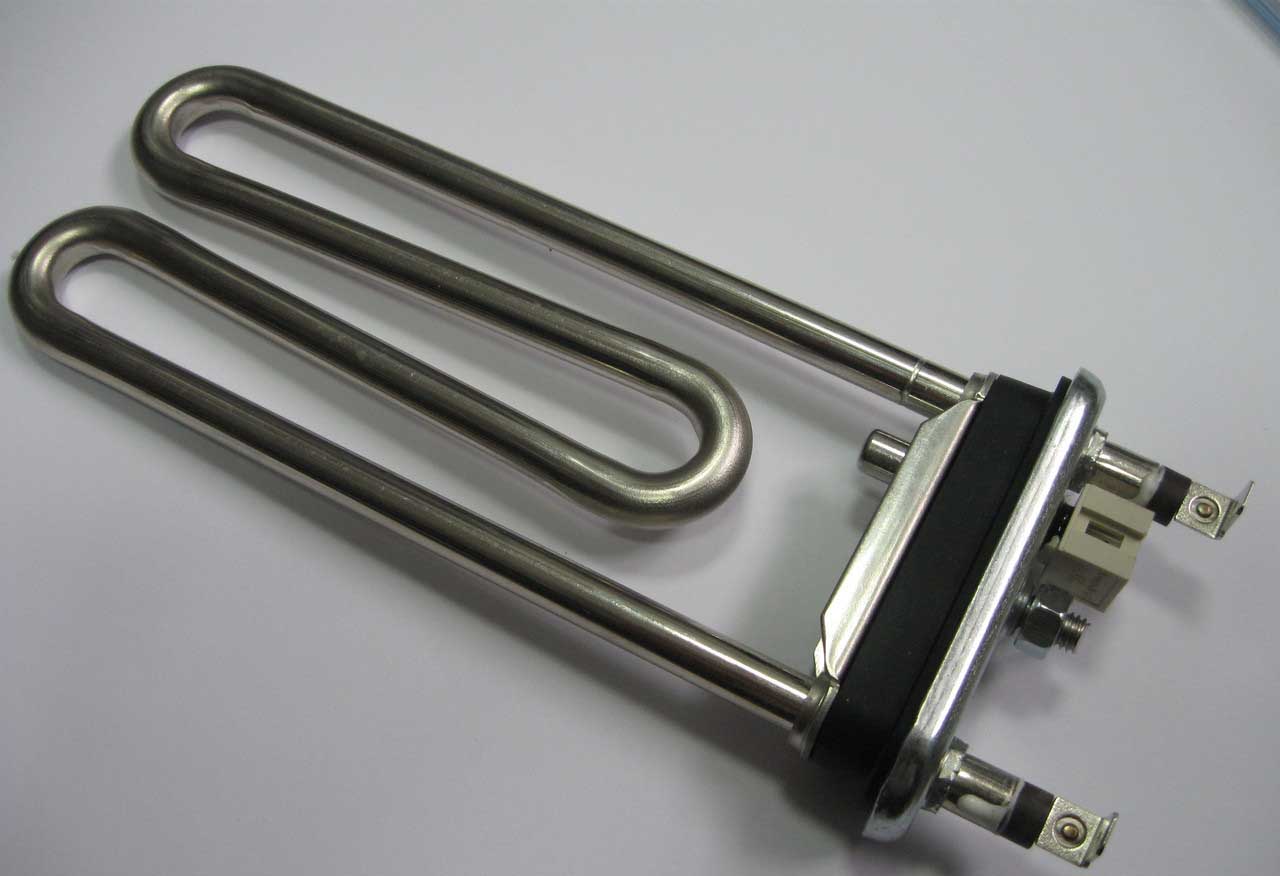
- The washing machine is disconnected not only from the electrical network, but also from the water supply. In this case, the remaining liquid should be drained from it;
- The back panel of the machine is inspected. If there is a small hatch, then the heating element is most likely located behind it. Otherwise, you will have to remove the entire panel;
- Having access to the heating element, use a multimeter to check its resistance. In a working element it should be 30 Ohms;
- the faulty heating element is removed, for which the fixing bolt in the center is unscrewed, all contacts and sensors are disconnected. You must act carefully with the temperature sensor - there is a tab at the top that is pressed before removing the contacts;
- Carefully rocking the failed element in different directions, we pull it towards ourselves. For this job you will need a screwdriver. You must act carefully so as not to damage the element. The heating element will be difficult to yield due to the rubber seal and scale formed during operation;
- If the heating element turns out to be working when tested with a multimeter, it can be descaled. Battery or citric acid are great for this. By the way, the second option is simpler, safer and much cheaper.You need to pour hot water into a container, add lemon juice, put in a heating element and wait for a while. By the way, it is better to place the container with the heating element on the balcony or under the hood, just take it outside. As a result of the reaction, a gas will be released that is not very beneficial for your health;
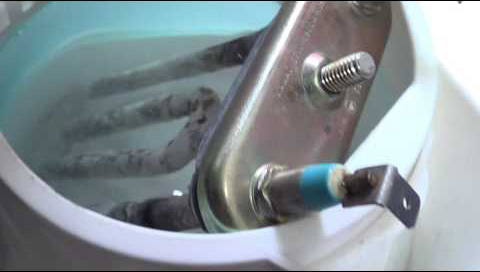
- While the heating element is being cleaned, you can remove the temperature sensor and immerse its metal parts in acid. The cavity should not be immersed, as the element will fail completely. After a few hours, our heating element will be completely descaled;
- Having cleared the place, we install a new element, tighten the clamp, and connect the wiring.
- We check the machine for functionality.
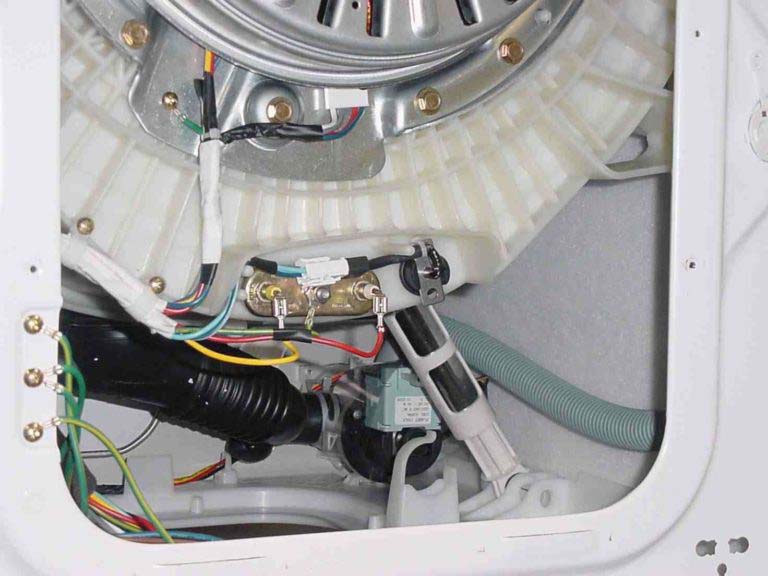
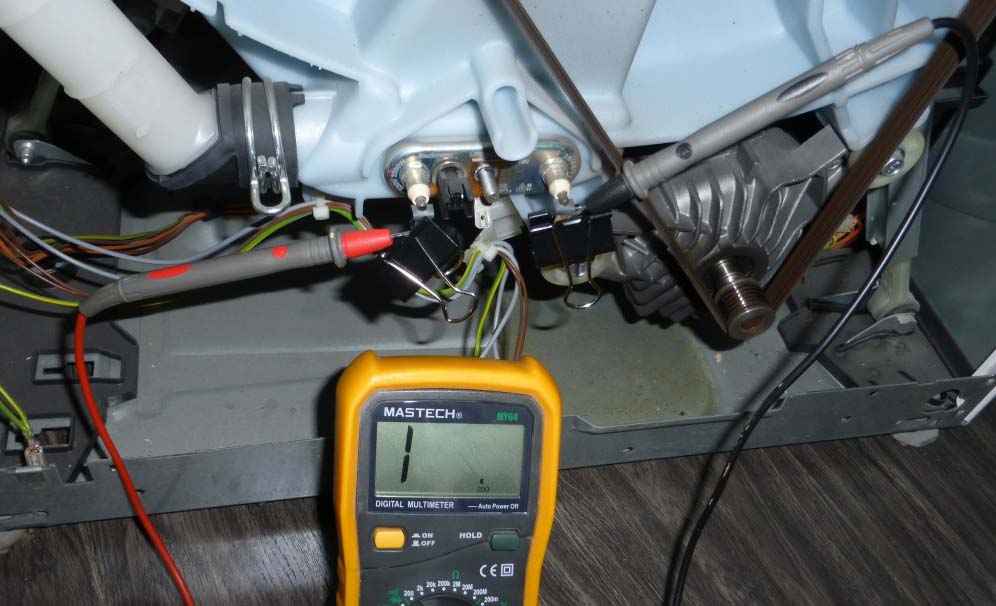
- Replacing the temperature sensor.
This is easy to do. On modern laundry washing units, a thermistor mounted on the water heating element is installed as a temperature sensor. And when you check the heating element, it will not be superfluous to make sure that the temperature sensor is working properly. If it breaks, it is replaced with a new analogue.
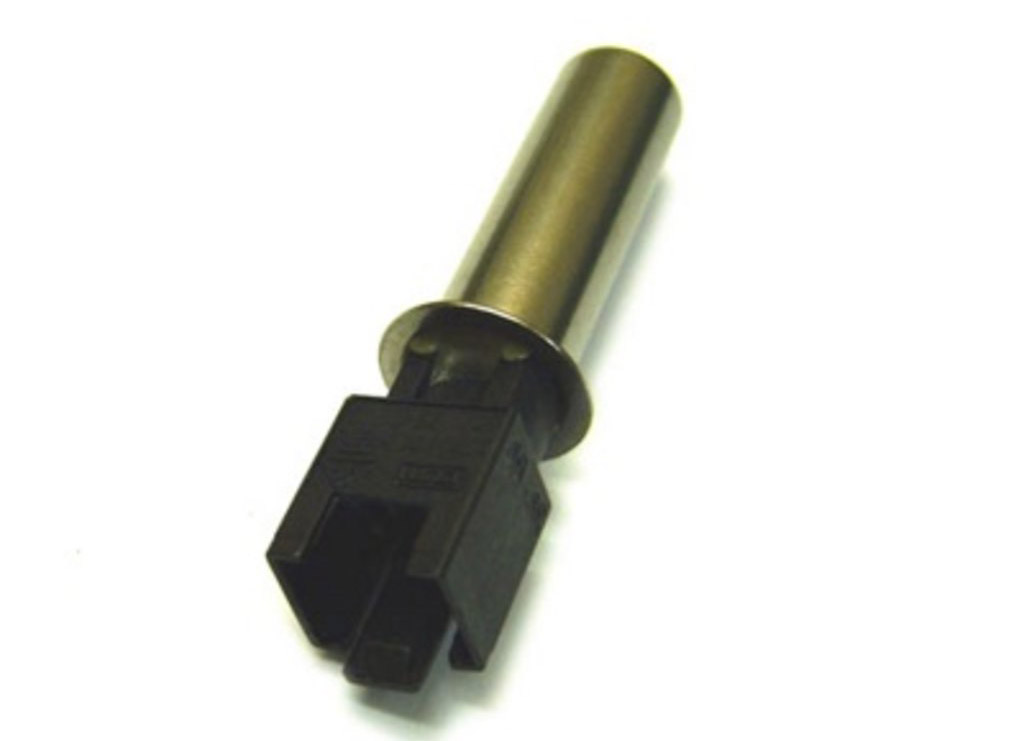
Please note that the sensor shows different resistance values when the temperature changes. The hotter the water, the lower the resistance. The serviceable condition of the device is confirmed by a continuous and smooth change in resistance readings. If this does not happen, you will have to replace it.
- Failure of the water drain pump.
And in this situation, you can fix the problem yourself. True, you will have to work harder than in the case of a heating element, since you will have to get there through the facade panel. In this case, actions are performed in the following sequence:
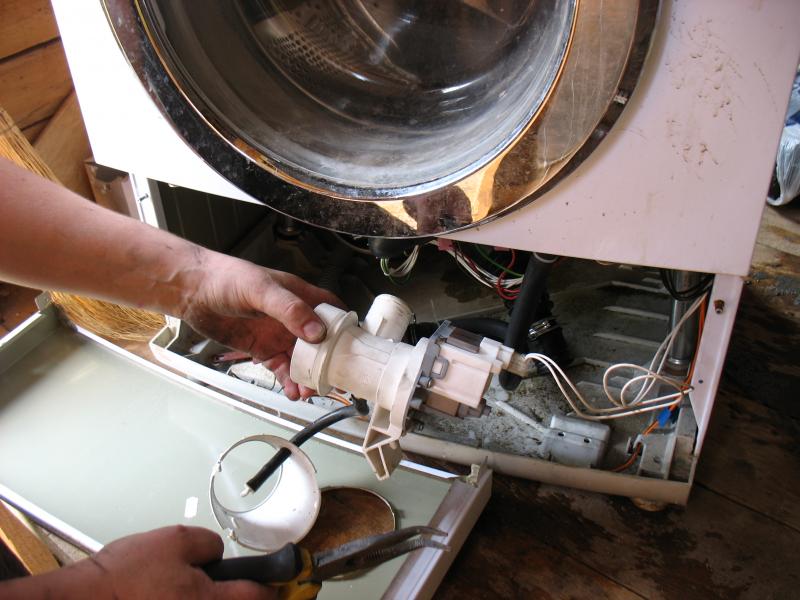
- The top panel of the washing machine is removed;
- the front cover is dismantled, behind which there is a filter for draining water.In this case, you can drain the remaining liquid, unscrew the bolts holding the pump;
- remove the detergent tray, unscrew the control panel fasteners;
- carefully lift the panel so as not to damage the wiring to the sensors and other units;
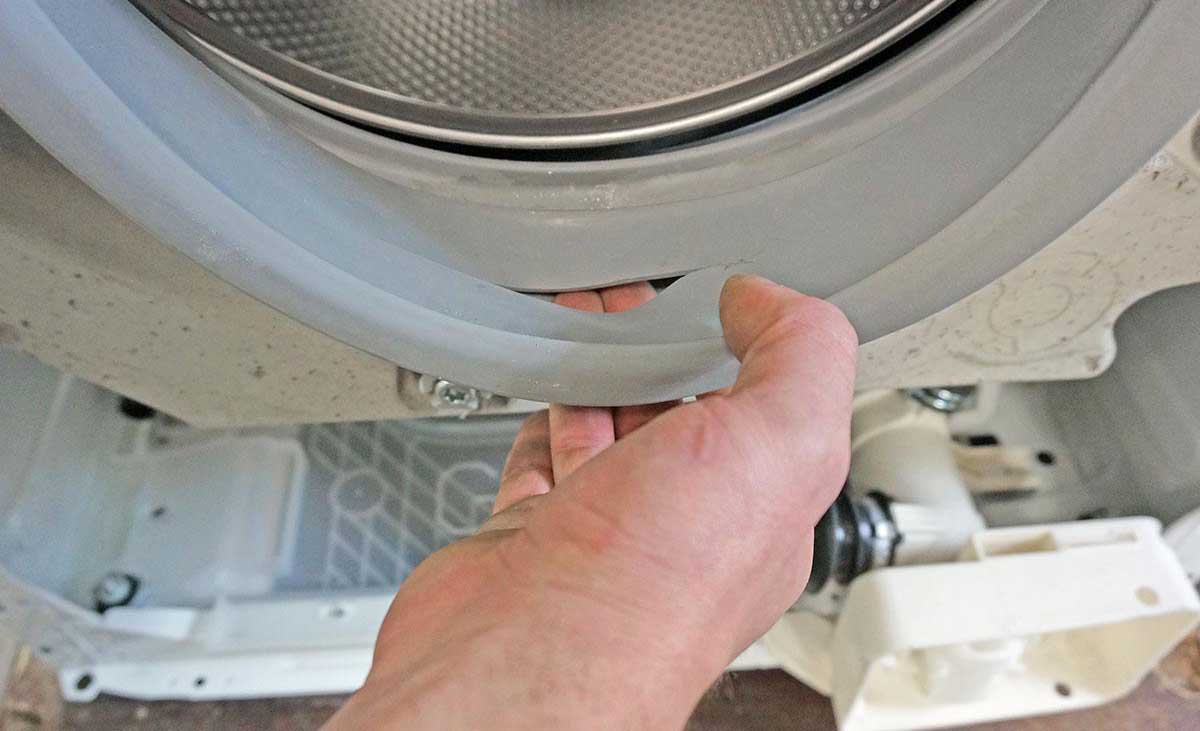
- dismantle the clamp on the drum cuff, remove the cuff itself from the wall;
- unscrew the bolts holding the front wall of the housing, remove it;
- disconnect all wiring from the pump, release the clamps;
- take out the pump, turn off the snail, check the impeller for foreign objects, breakages and debris. The pump winding is checked using a multimeter;
- the failed pump is replaced with a new original, its installation and assembly of the machine are carried out in the reverse order.
- Control panel failure.
Such a failure can cause certain difficulties. A panel malfunction can manifest itself in various symptoms associated with failures of other units. For this reason, the first difficulty when working with the module is diagnosing its breakdown. The second point is to determine the need for repair work or a complete replacement of the element. Such work should be entrusted to experienced specialists who can test the module using special devices.
It should be noted that a complete replacement of a failed module costs up to forty percent of the price of the entire machine. In this case, you should consider the feasibility of such a repair. Maybe it is better to buy a new device?
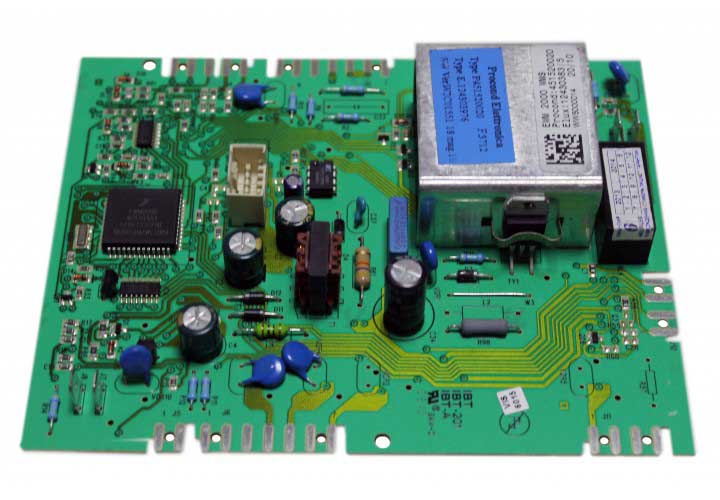
For those who decided to try to repair the board themselves, this instruction will come in handy:
- in the upper part of the board on the left is a unit that powers the controller. If it fails, the machine will not wash. The stabilizer is on the right, and on the left below is the controller unit.Let's look at the potential problems. The description of error E 66 says that there is a discrepancy in the information received by the controller. To fix the problem, it is necessary to replace the failed parts. The water heating element is connected to a connector located in the middle part of the board. Here the problem may be hidden in the resistors near the connector, a large resistor or a relay - a pair of white cubes. All this should be called. If everything is fine, go to the microcircuit that controls the relay. In principle, it is she who is responsible for controlling the activation of the relay and protecting the controller from power surges. To perform the test, you should take a multimeter, set it to diode ringing mode, and ring the tenth to sixteenth contacts one by one. If there is a breakdown, you will have to replace the entire microcircuit.
- The machine is leaking - what to do?
This problem also occurs often. The presence of water when the electrical network is turned on is undesirable; for this reason, the breakdown is acute and even dangerous; it must be eliminated immediately.
Often the reasons for this are the door seal or the inlet hose. The pipes leading to the drain pump or seals that have served their service life may become inoperable. It is quite possible to replace all these parts on your own.
Conclusion
If you decide to repair the AEG washing machine on your own, remember that this task is quite complex. Modern technology requires basic knowledge on this issue, and it would be better if you contact a professional technician. Most simple parts that will have to be changed require some experience.And if you contact the service center for help, the technician will not only identify the breakdown and fix it, but also perform a full inspection of all components and assemblies of your washing machine. In addition, all work will be given an appropriate guarantee.


Hello. In the German washing machine AEG 52600, the rubber tube with the plastic ring has come out of place several times already. During the pumping process, due to the fact that the rubber tube has moved out of its place, water pours out onto the floor and not into the sewer pipe. How to install the tube and secure it yourself, as well as what tools are needed.