If the drum in the washing machine is knocking, this may indicate serious damage. Malfunctions are not always accompanied by extraneous noise. However, if sounds appear, it is urgent to diagnose the condition of the washing machine. Delay may result in the need to purchase a new device.
Reasons why the drum in the washing machine knocks
The drum can knock due to various factors; the appearance of a defect can be affected by the forgetfulness of the owners or wear of parts. Among the main reasons:
- Incorrect installation. If you do not park the machine level after purchase, a loud noise will be heard when the cycle starts. In addition, during the spin phase the appliance may begin to move.
- Bearing wear. Signs of a problem are wet laundry, even after an intensive spin cycle. This problem occurs on old devices that have been in use for about 10 years.
- Loose counterweight mount. Modern tanks are made of plastic, so they are quite lightweight.Due to its light weight, it begins to vibrate when the drum rotates. The counterweight is designed to block vibrations. Cement is usually used for production.
- Shock absorbers malfunction. The part serves to reduce vibrations when the drum moves. Usually occurs after prolonged use.
- Object stuck between drum and tank. The problem usually occurs when cycling at high speeds. Small objects can cause problems, not just trash left in your pockets. For example, a children's sock or an iron wire from a bra.
- The network filter is faulty. It protects against power surges. Usually the part simply unscrews due to constant vibration when the drum rotates.
- Imbalance of laundry inside the drum. If the load is overloaded or, conversely, underweight, the laundry begins to bunch up. As a result, the drum will begin to knock during washing.
Fault diagnosis
It is not necessary to contact the service center if strange sounds appear. Some breakdowns can be fixed on your own, the main thing is to correctly identify the source of the problem.
To do this, it is necessary to evaluate the nature of the sounds produced:
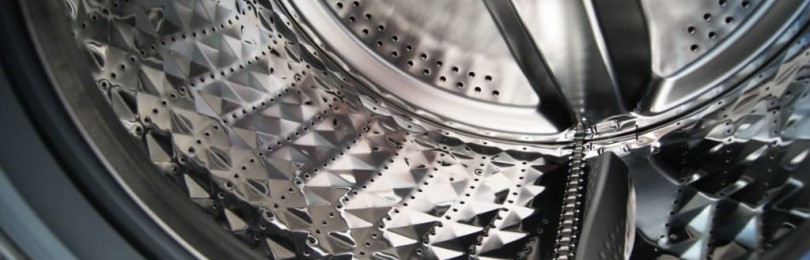
- The knocking noise occurs during washing and spinning. This type of noise may indicate that there is an object caught in the space between the tank and the drum. They usually penetrate through the perforations or sealing rubber of the hatch.
If the object is not removed in time, it can block the pump and break the pipe. Small items left in pockets can also cause noise. For example, coins will make characteristic sounds during the cycle. A knocking noise can also occur due to the contact of rivets and buttons of clothing with the walls of the drum, or when things are placed incorrectly.
The machine may also make loud noises when washing due to improper installation. To diagnose the position of the device, you need to use a level. If the machine is installed incorrectly, the measurements will reveal a skew. Another explanation is a loose filter. - Strong creaking and grinding noise when drum speed increases. Usually such noise indicates bearing failure. They are protected by an oil seal from moisture, but over time the lubricant is washed out. This leads to wear of the rubber part and then the bearings.
- Clicks and squeaks when spinning the drum. The explanation for the noise is damage to the dampers or shock absorbers. Their function is to restrain strong vibrations during spinning at high speeds; they support the tank from below.
- Humming, vibration, or loud noise during cycle. Such sounds appear due to the destruction of the counterweight. It serves to maintain balance. Another possible malfunction is that the counterweight is not destroyed, but its fastening is simply weakened.
- A strong buzzing sound accompanied by a stop in the cycle. This noise is due to a faulty pump.
Do-it-yourself troubleshooting
Many breakdowns can be fixed on your own, without contacting a specialist. It is important to use the correct tools and follow the instructions provided.
The washing machine is not installed correctly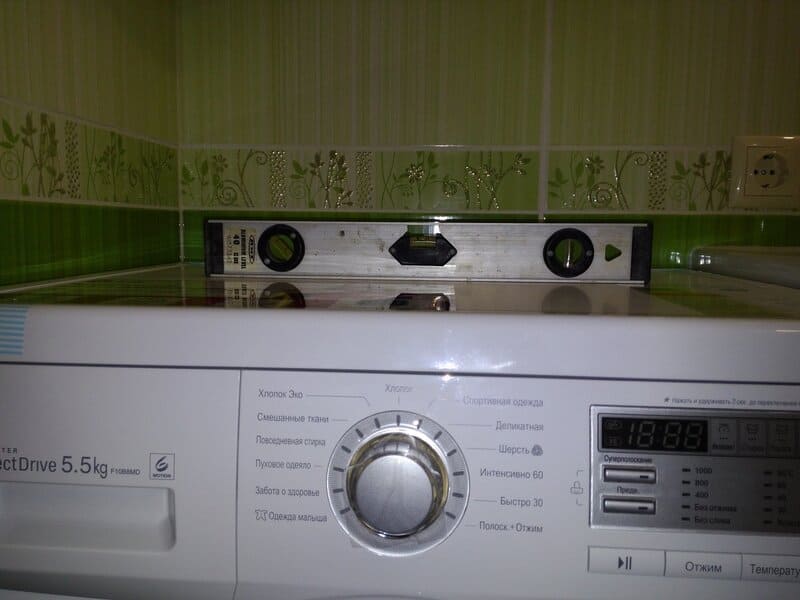
Sounds may occur due to improper installation. To fix the problem, you need to check for the presence of shipping bolts. Some users forget to remove them after purchase. Using an open-end wrench, you need to adjust the legs of the machine. If the surface of the coating is too uneven, you can use silicone supports. They will dampen vibration and increase the area of contact with the floor.
The items in the drum are unevenly distributed 
To eliminate the sound, you need to correct the imbalance of the laundry. The process of correcting the problem takes place in several stages:
- You need to press the "Pause" button on the control panel.
- If the machine has already filled with water, then it needs to be drained. This can be done by opening a small hatch. It is located at the bottom, under the laundry loading door.
- A filter will open, which must be unscrewed. Water will gush out, so you must first put a container.
- Now you can open the loading door and redistribute the items inside the drum.
A similar problem often occurs in old-type machines, since they are not equipped with the "Imbalance Protection" function. In addition, manufacturers now equip devices with an auto-weighing system. This allows the user to control the process of loading things. As a result of the introduction of such technologies, the occurrence of imbalance is minimized.
Owners of old-type machines need to carefully study the operating instructions. First, it is necessary not to exceed the norm for loading things. Secondly, some modes require loading the laundry less than the permissible level. Thirdly, small items of clothing should be loaded together with large ones. This measure will also help to avoid imbalance.
Knocking during washing can also occur due to fasteners touching the walls of the drum during rotation. Therefore, it is advisable to wash clothes with a lot of fittings in a special bag.
Otherwise, such parts can come off during spinning at high speed. Sometimes the user forgets to check the pockets before loading.
Clothes with small change or other small items end up in the drum.They must be removed so that they do not penetrate further. To do this, you need to drain the water and open the door (according to the instructions given above). For ease of searching, things can be removed into the basin. Only after removing all foreign objects from the pockets can you load.
A foreign object has gotten between the tank and the drum
Items usually collect behind the hatch cuff or in the filter. Sometimes you have to resort to removing the heating element or tank. The location of the heating element is different, since the internal structure of the devices is determined by the manufacturer. Typically, to gain access to the part, you need to remove the front wall. Now you need to disconnect the wires leading to the heating element. The next step is to unscrew the bolt going down the center. Now the part can be pulled out, and then the foreign object can be removed.
The shock absorber (damper) has failed
To replace dampers, follow these steps:
- The top panel needs to be removed. To do this, you need to unscrew the screws located on the rear panel. And then push the top cover.
- Now you need to disconnect the dashboard. To do this, remove the tray by pressing on the central latch. Now you need to unscrew the bolts holding the dashboard. The contacts from the part must be carefully disconnected. Before doing this, it is necessary to photograph the position of all wires.
- Now you need to remove the hatch cuff and the metal clamp holding it. This is convenient to do with a screwdriver.
- It is necessary to disconnect the contacts and bolts of the hatch lock. Then the part needs to be removed.
- At the last stage, the front panel fastening is removed.
The process of removing dampers occurs as follows:
- To remove the lower mount, you need to unscrew the bolt.
- To dismantle the upper part, you need to remove the rods. To neutralize the latch, you need to secure the nut to the rod.
- Now you can remove the rod along with the shock absorber. It is convenient to use pliers for this.
The counterweight is loose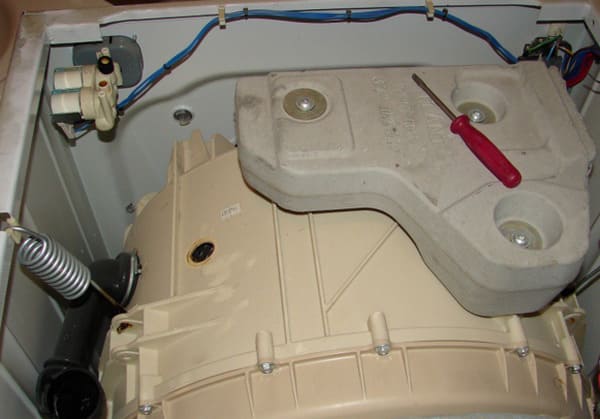
It is necessary to dismantle the front wall, since the counterweights are usually attached to them. You can adjust the position of the counterweight as follows:
- You must remove the tray completely by pressing the latch located in the center.
- In the opening that appears, you can see several bolts. They must be unscrewed to remove the control panel.
- Sometimes it is necessary to additionally press the plastic latches. You can use a flat-head screwdriver for this, but it is advisable to carry out the procedure carefully.
- Now you need to unscrew the fasteners located at the top of the front panel. Now the wall can be removed.
Now you have access to the counterweights, you need to carefully inspect them. If damage is detected, the part requires complete replacement. If the counterweights are working properly, you need to check the fastening. Before repairing, it is advisable to look at the location of the parts in the data sheet. On some models, the counterweights are located at the bottom or rear.
Bearings have failed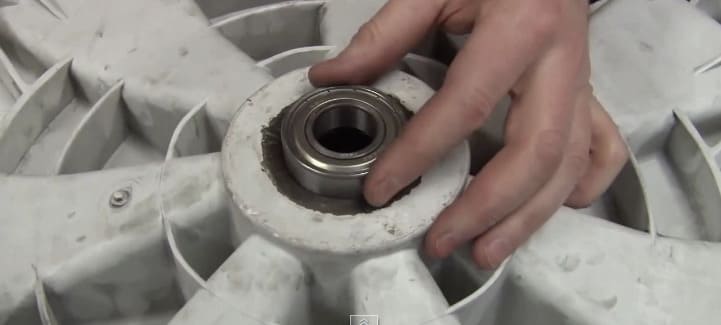
Replacing faulty bearings is a rather lengthy process, as you will need to completely disassemble the machine. Fortunately, purchasing a new part will not require new investments. However, if you delay repairs, the tank and crosspiece will break. In this case, replacement will no longer be justified, since purchasing a new device will be a more profitable option.
The following tools will be used during the repair process:
- set of screwdrivers, flat and Phillips type;
- adjustable wrench;
- a hammer, rubber or wooden (if necessary, you can use a regular one, but when working you will have to strike through thick rubber);
- set of open-end wrenches;
- lubricant (it is recommended to use lithol);
- chisel or wrench.
To get to the bearings, you will need to disassemble the device body:
- It is necessary to dismantle the rear wall. To do this, unscrew all the screws around the perimeter. Equipment from some brands also requires removing the top panel.
- It is necessary to disconnect all contacts going from the tank to the sensors and heating element. (It is advisable to capture the process on photo or video).
- Now you need to remove the belt, which transmits impulses from the engine to the drum drive.
- To remove the heating element, you need to loosen the pressure shirt and press it inward. This will release the cuff; removal occurs through rotation passing at an angle.
- Use a wooden stick to secure the flywheel, which will prevent the flange from rotating. A screwdriver can be used if necessary, but extreme care must be taken. After all, a metal tool can pierce the drum.
- To remove the flywheel, you must unscrew the fixing bolt.
- To remove the drum, you need to remove the bolts holding the two halves of the tank together. This will allow you to get the part without completely disassembling the device. The first half of the tank will remain inside the washing mashine, housing shock absorbers and an electric motor.
To remove the bearings, you will need to follow these steps:
- Using a hammer, you need to knock out the shaft. Care must be taken when working, as the part may be damaged due to too powerful impacts.
- Now you can see the oil seal and bearing.To remove the first part, you will need to pry it out with a screwdriver. If you can’t remove it, you can use a chisel and hammer. The end of the tool must be placed between the seal and the tank. Now you need to give the handle a few light blows with a hammer, this will allow you to remove the seal. After this, you need to remove the bearings - external and internal.
- Before installing new parts, the groove must be cleared of scale and dirt. Various detergents usually help. For severe contamination, you can use sandpaper.
- After cleaning, you need to install the inner ring into the seat, followed by the bearings and oil seal. The last part needs to be pre-lubricated with lithol.
- Before installing the tank on the shaft, it must also be freed from dirt and lubricated.
Line filter failure
Any user can change or screw on a broken filter. First you need to provide access to the part, so you need to unscrew the top panel. The part is located on the side wall, near the power cord. To eliminate the defect, you need to tighten the loose fastener.
Prevention of washing machine breakdowns
Experts have prepared several tips to increase the service life of equipment:
- clothes with an abundance of buttons, rivets and other small parts must be washed only in a special bag;
- Before putting clothes in the tank, you must check all pockets and compartments for debris, coins and other objects;
- the permissible drum loading volume must not be exceeded;
- with hard water, you should always use softening agents, otherwise scale will corrode the heating element;
- the device must be installed on a flat surface, if necessary, the position must be adjusted;
- After the cycle, it is necessary to open the detergent tray and the hatch for storing things, otherwise the remaining water will lead to the formation of mold.
Conclusion
There can be many reasons for the appearance of extraneous sounds. Sometimes the problem arises due to simple user inattention, and sometimes when parts fail. In most cases, getting rid of knocking is quite simple; just redistribute the laundry or remove foreign objects. However, in difficult cases, it will be necessary to disassemble the device, including removing the tank.


