 Washing machines from Zanussi are quite reliable, but even they can break down from time to time. In many cases, you can carry out the repairs yourself, which will save you on additional costs. This article is about how to change the bearing on a Zanussi washing machine.
Preparation process
If the bearing has collapsed, the washing machine will make a loud noise while spinning clothes. After each wash the noise will only get worse. Therefore, the sooner the bearing is replaced, the better. The shaft and the seat for it will also be damaged ahead of time if you operate the washing machine with a faulty part. The seal also wears out, which leads to the appearance of additional marks on the laundry.
If the shaft is subject to abrasion, processing using additional equipment will be required. A crosspiece is purchased if it turns out that restoration is impossible. It is quite difficult to choose a part that would be absolutely suitable for a specific brand of washing machine. Usually you have to place an order, waiting for delivery takes from several weeks to a month.
A set of replacement repair work is carried out using the following tools:
- Gun along with plumbing silicone.
- Hammer and chisel, drift, knife.
- Round nose pliers and pliers, wire cutters, clamp pullers.
- Set with socket heads. Available in sizes 17, 13, 10, 8.
- Phillips screwdriver.
- Slotted screwdriver. If everything is there, replacing the bearing will not be difficult.
The grinder is also used, but only if complications arise. You cannot do without a special lubricant for the oil seals along with a thread locker. The latter is available in blue. A tool like a flashlight will also come in handy. Without it, the replacement will not be as effective.
We disassemble a Zanussi washing machine
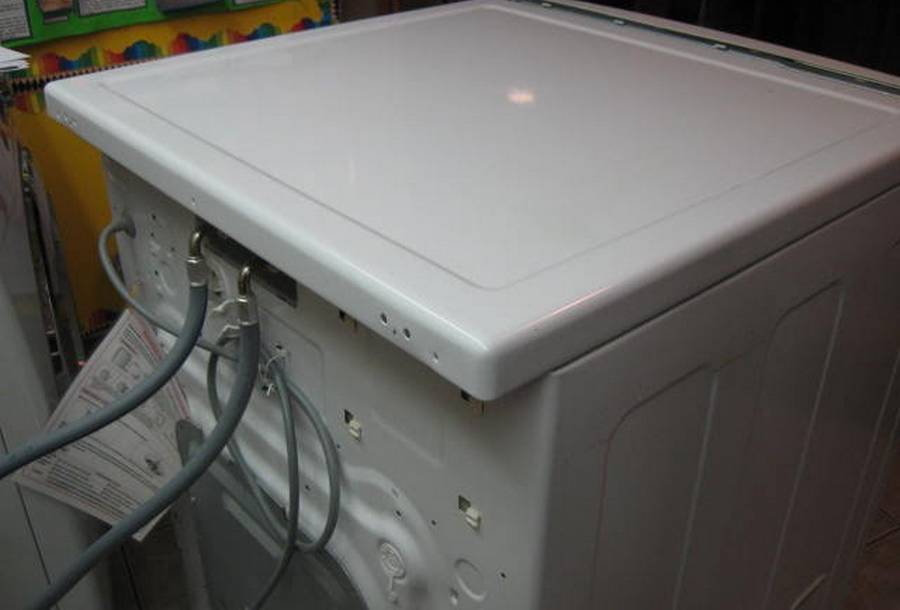
The device must be dismantled before any specific repair work can be carried out. The first step is to detach the top cover. It is screwed to the main body with two screws. The 8mm socket and ratchet help get the job done with minimal effort. After unscrewing, the cover is removed.
The wall fits into the technological protrusions on the body with two plastic latches. Therefore, when disconnecting during replacement, some effort will be required, but not very much. Standing facing the front, you can hit the surface with your hand. The main thing is not to overdo it when replacing a bearing.
After this, the half located at the back is removed. This often also includes the side of the body. During repairs, thanks to this technical design, the owner receives certain advantages. After all, you can get access to literally all parts of the device, the bearing is no exception.
Two screws on each side will need to be removed. The following is the replacement sequence:
- Unscrew two bolts, closed with a plug. They are located below on each side.Nearby are the junction points of the body halves.
- The water fill panel with valves is detachable from the back part.
- Take a regular slotted screwdriver and unfasten the latches.
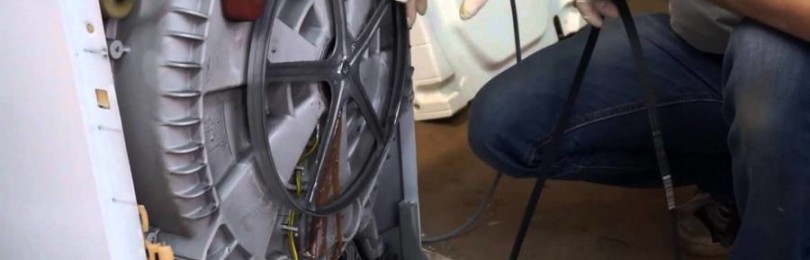
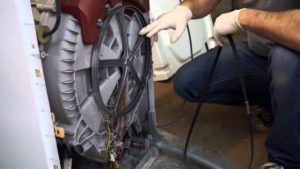
- The belt is removed from the electric motor and drum pulley.
- Disconnections require a rubber tube from two pressure switches.
- The screw on the clamp also needs to be loosened. But complete unscrewing is not required.
- The clamp is needed to hold the rubber pipe between the dispenser and the tank.
- The tank itself of the Zanussi washing machine can be unfastened.
The result of the actions will be that only two elements remain on top of the tank - springs in contact with the body. They are used to dampen vibration around the device.
After the previous step, the user needs to go to the part below. Electrical wiring must be disconnected from the water heating tank. The main thing is to remove the contacts from the temperature sensor as carefully as possible. A plastic latch is used for pressing during replacement.
The plastic ties that connect the electric motor and the tank must be cut off using wire cutters.
The motor is disconnected from the grounded contact group. Sometimes you have to use pliers to finish working on your Zanussi washing machine.
The plastic latch on the side is pressed. The chip is pulled out.
The grounding from the bushings with bearings is also disconnected.
The result is a separate tank, disconnected from the electrical wiring. It is necessary to remove the corresponding cable deep into the washing machine. Then there will be no chance of accidentally damaging the mechanism. To make the tank as light as possible, it is recommended to remove the motor completely. This will also protect the electric motor of the Zanussi washing machine from moisture entering in large quantities.
What else needs to be done?
The sequence of actions when replacing bearings on a Zanussi washing machine will then be as follows:
- Four bolts are unscrewed. Two of them are located in front, two more are located in the back.
- In the depths of the washing machine there are two more parts that will need to be unscrewed.
- Extensions and a universal joint are tools that will be needed during unscrewing.
- The Zanussi washing machine engine is pulled out after all the bolts are unscrewed.
- Shock absorbers must be removed. They are held inside plastic fasteners using bushings.
- There is no point in removing two shock absorbers at once on a Zanussi washing machine. A convenient option is when they remain fastened to the body of the Zanussi washing machine, but with little force.
Removing the bushings used to hold the shock absorbers has its own nuances. The bushings cannot be pulled out due to the protruding latch on the back of the Zanussi washing machine.
Therefore, pulling the bushing towards you and clamping the valve from behind occur simultaneously. At first you can pry everything off with a screwdriver, but then you still use pliers.
The next step is to disconnect the drain pipe going to the pump. Or you can simply pull it off. But the latter option is considered more complex due to the fact that the structure with the pump is located in the very depths. And the pipe itself can easily be damaged if you are careless. Therefore, replacing bearings requires a careful approach.
To unhook it, use a screwdriver to simply loosen the metal housing. The pipe is then pulled off quite easily. But you will need to remove another bandage.It connects the expansion tube and the pipe, and the tube goes to the pressure switch. Pliers will help you remove the clamp if necessary during replacement.
The Zanussi washing machine cuff is the last part that remains connected to the tank. To press it, use clamps equipped with small teeth. You just need to gently pull it towards you, slightly moving the teeth apart.
All that remains is to remove the plastic bandage and unfasten the cuff from the body of the washing machine. At the next stage, the tank is simply pulled out. While the structure itself is held, the springs are unhooked one by one.
The main thing is that the Zanussi washing machine cable requires careful handling, otherwise one of the wires is easily broken.
Bearing replacement procedure
The tank requires complete disassembly, otherwise the bearing cannot be changed. It is recommended to remove the counterweights from the same part so that the work goes faster. Through fasteners are also unscrewed in this case. The front part located around the cuff also needs to be removed.
The following actions have a certain order:
- The rubber is pulled off completely. It is pressed to the body by a round clamp in the form of a spring.
- A 17mm socket is used to remove the pulley.
- It will take some effort, so it is recommended to use a kind of lever.
- To create the necessary force, an ordinary metal pipe is also suitable.
- Special marks are applied to the rubber - this is done to prevent unwinding during rotation.
- The bolt from the clamp simply will not come off without additional force.
- After the operation is completed, twisting will not cause problems. Zanussi washing machine disassembled.
The small counterweight under the pulley will need to be removed.
To secure the two halves of the tank, ordinary bolts are used. Each of them will need to be removed. You can't do without an extension for a socket wrench.
The two halves of the tank are separated, after which the drum is pulled out. Sometimes extra effort is required to get the device to come out. In this case, a hammer is used and several blows are made.
Do not hit the shaft directly, as this will damage the part. You need to secure a special bolt, and then hit it through a plank.
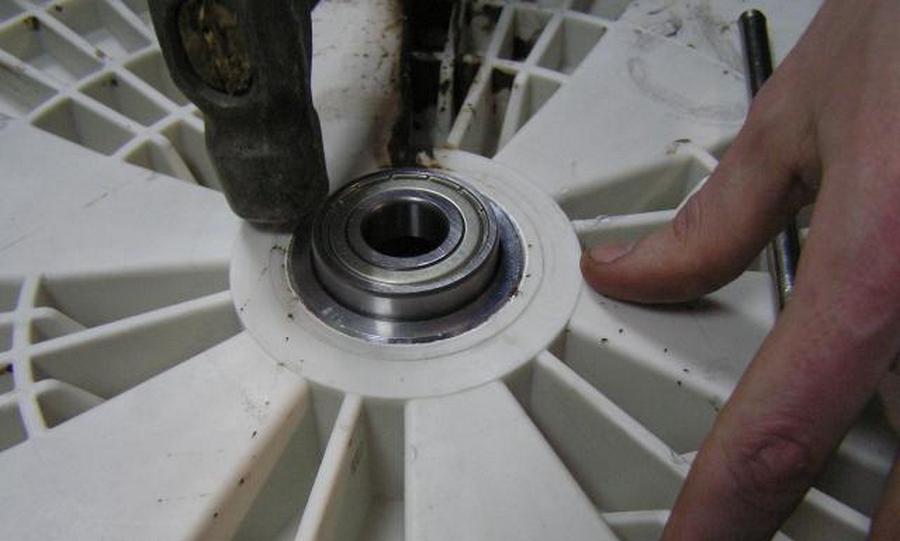
A complete cleaning of the inside of the tank seat is required. After this we get rid of the oil seal. A chisel or a strong screwdriver will become indispensable assistants. A hammer is often added to solve problems with a Zanussi washing machine.
The next step is to pull out the metal clamp. It is located below the oil seal, inside a kind of groove. This is necessary to fix the position of the bearing. A slotted screwdriver or pliers are best suited to replace the bearings of a Zanussi washing machine.
All that remains is to knock out the bearing, for which they often use a chisel. The device is equipped with two platforms, narrow on one side, wide on the other. Start by dismantling the outer bearing using a medium-sized hammer.
Conclusion
Replacing bearings is a job that even a novice home craftsman can handle without any problems. You just need to stock up on materials and tools with suitable characteristics.
The main thing is to approach the replacement work carefully, not to lose sight of even the smallest details. It is not recommended to save on purchasing the bearings themselves for Zanussi washing machines. To glue the tank, do not use regular silicone.Only if the requirements are met will the Zanussi washing machine last a long time. You can turn to specialists if you have even the slightest doubt in your own abilities. We must also remember about the oil seal. It is necessary to use only a special lubricant for it, intended specifically for washing machines, not necessarily from Zanussi. Then the result will be appropriate.


