 With the advent of washing machines and other household appliances, performing household chores has become a simple task, which is why 90% of people have such units installed. Breakdowns can occur during operation even with products manufactured by well-known manufacturers. You can repair LG washing machines yourself; you just need to know the features of the process and some nuances that indicate changes in the performance of the device.
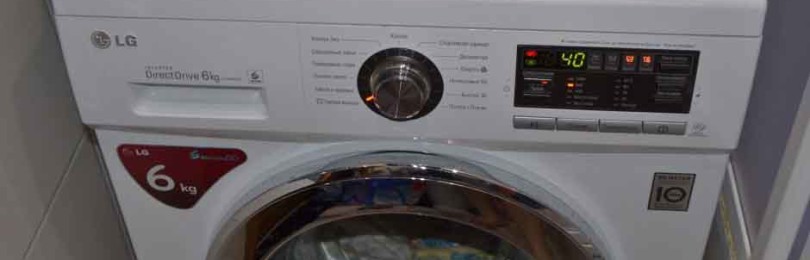
The Korean manufacturer uses modern technologies that make it possible to extend the life of parts or motors installed in washing machines - for this purpose, technology is used that uses the direct wire principle. Such washing machines are characterized by specific malfunctions that the average user needs to know in order to fix them at home.
Operating principles
The operation of modern washing machines is based on the general principles of similar devices that were used in the first stages of their production - water (ordinary, room temperature) enters the body, then it is heated by the device to user-specified values. Linen is placed inside the tank and washed using a rotating drum. This operating scheme is the main one for any device, so up to 70% of breakdowns are associated with the main components, the rest falls on the control panel and additional capabilities of the machine.
Features of work
In order to better understand the cause of the breakdown, you need to understand how the main stage of work is carried out after starting the program. The machine performs the following actions:

- The valve that supplies water to the tank opens (enters through a dispenser installed in the tank).
- The water is heated to the parameters specified by the program.
- The heating element turns on.
- The motor turns on, causing the drum to rotate.
- The main wash cycle is running.
- Finally, the water drain pump (pump) is turned on.
Also, to eliminate major breakdowns, you should know what the main elements of the device are called and what they do:
- Dispenser – container for detergents (powder, gels, softeners).
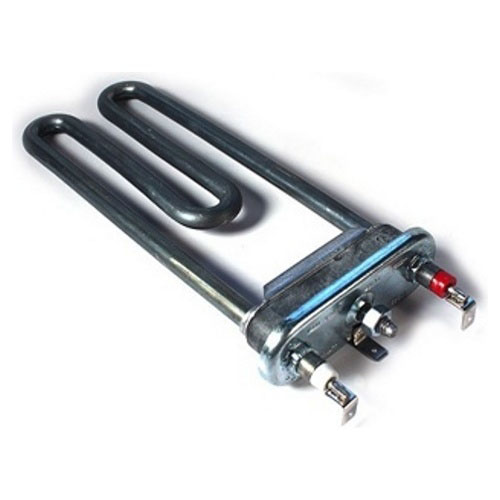
- Heating element – heating element.
- Tank – a container for water (it also contains a drum and heating element).
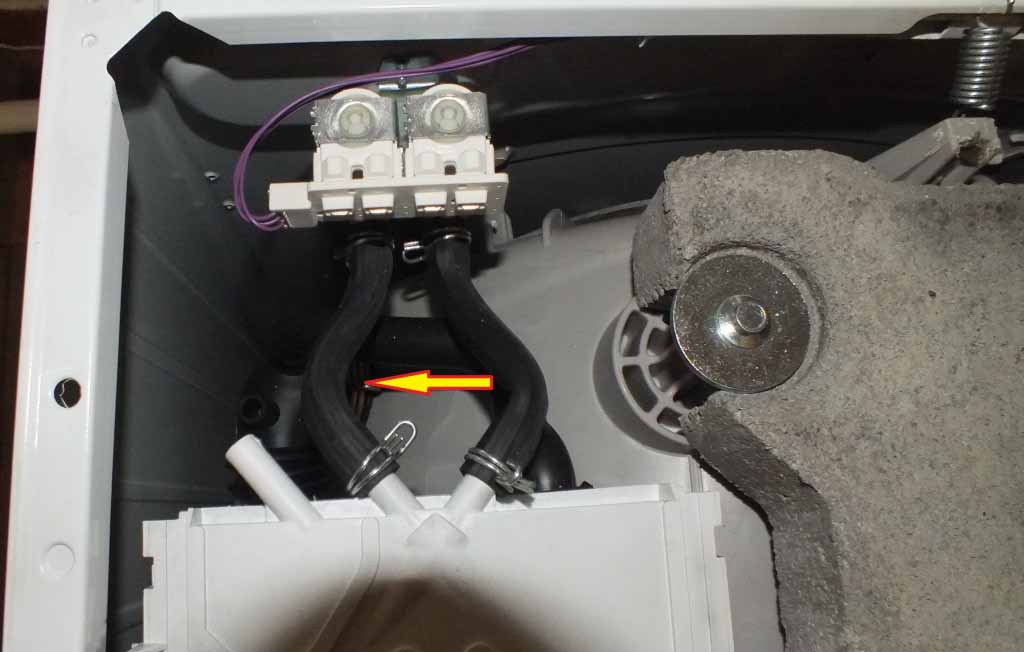
- Pressure switch (pressostat) – controls the level of filling of the tank with water, shuts off its supply if necessary.
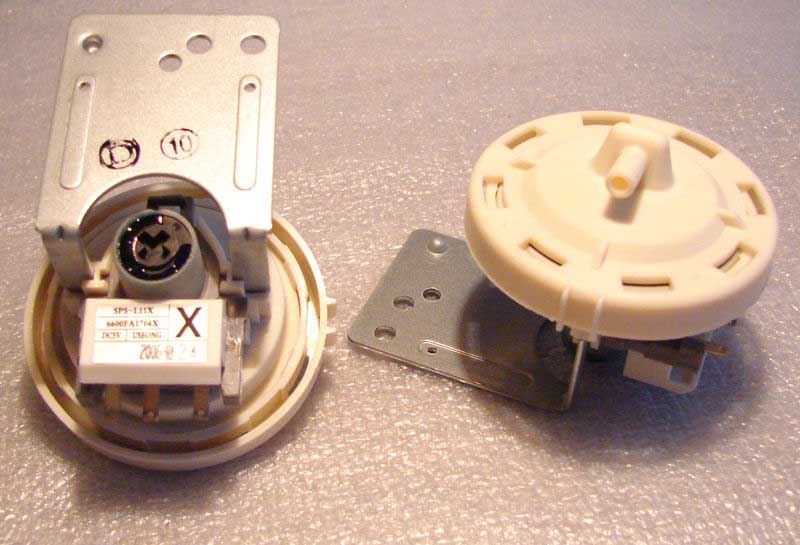
Washing machine pressure switch
- Thermostat – controls the temperature indicators of water heating, connected to a pressure switch.
- Pump – a pump designed to drain water.
In addition to the details, you will need to take into account the presence of basic components in machines of this brand that ensure stable and uninterrupted operation of the device. The devices contain:
- Water filling system.
- Water heating system.
- A system that starts and carries out laundry washing.
- Water drainage unit.
- System for spinning washed clothes.
- Drying system for washed clothes
It is important to remember and take into account when carrying out repairs with your own hands that in each subsequent model the company’s developers strive to improve a certain system or component, add parts to it and increase the range of functions performed. This can complicate the process and make it impossible to do at home, so it is recommended that you carefully read the operating instructions supplied with the washing machine to avoid premature repair work.
You will have to be careful and follow the rules already at the stage of loading laundry, since, for example, a button that comes off during washing can damage the drum or the system responsible for draining the water.
Common types of breakdowns
Washing machines of this brand meet all international requirements, standards, and regulations, but even with them, breakdowns can occur. The main source of pride for LG washing machines is the engine. According to statistics, out of 500 calls to a workshop or service center, only 1 case is associated with the breakdown of this part. In 90% of cases, failure is associated with faults caused by manufacturing defects. In 70% of cases, breakdowns occur in moving elements and parts that are subject to increased load.
The main units of the LG washing machine that become unusable and must be replaced in most cases:
- A heating element.
- Pressure switch.
- Various wires and terminals.
- Drain pump.
- Fill valve.
It is important to remember that these elements are basic, without them the operation of the unit is not possible.
Symptoms of breakdowns manifest themselves differently for each machine. To carry out independent diagnostic measures, it is necessary to analyze the cases that occurred with other devices from this company. Only after a person is sure of the cause of the breakdown can the unit be disassembled.
Approximate breakdowns
If we analyze recorded cases of failure of the heating element (heating element), then the error code that will appear on the display will be “NOT”. In some cases, no indication appears, but the problem is present. Then, before carrying out repair work with your own hands, you will need to carefully monitor the washing process. Attention should be drawn to:
- The process of dissolving the powder (whether it dissolves completely, how long it takes).
- How warm or cold the manhole cover is during operation of the unit.
- Washing quality (whether the laundry is washed well or poorly after completing a full cycle).
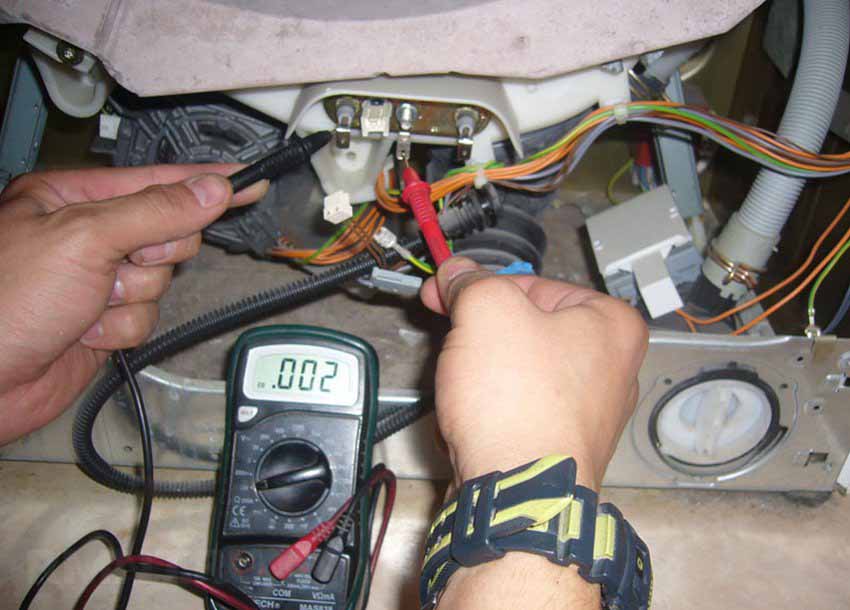
If there are deviations from the stated standards, you should not undertake repairs - you will need to measure the voltage at the contacts of the heating element using a multimeter.
The pressure switch may also fail. The main symptom indicating a problem is the independent draining of water, which can occur at any stage of the washing cycle.You can determine the problem by observing how water constantly fills and then flows out of the tank. The problem is that the sensor installed in the unit does not send a signal that the tank is full to the required values, so the fill valve remains open. In 95% of cases, this type of breakdown can be fixed with your own hands.
Failure associated with failed bearings manifests itself in a loud squeaking sound when the drum rotates. Feature - the sound intensifies at high speeds. In order to carry out quality independent diagnostics, you will need to turn the washing machine drum left and right. If the bearings need to be replaced, a constant creaking or knocking noise will be heard during this procedure.
If problems such as:
- Closures
- Shutdown.
- Reboot the module.
In this case, you need to pay special attention to the condition of the wiring and terminals of the unit. Modules rarely need to be replaced. In 90% of cases, the main problem arises with the wires that fit the unit sensors, as they often fray, resulting in short circuits or burns.
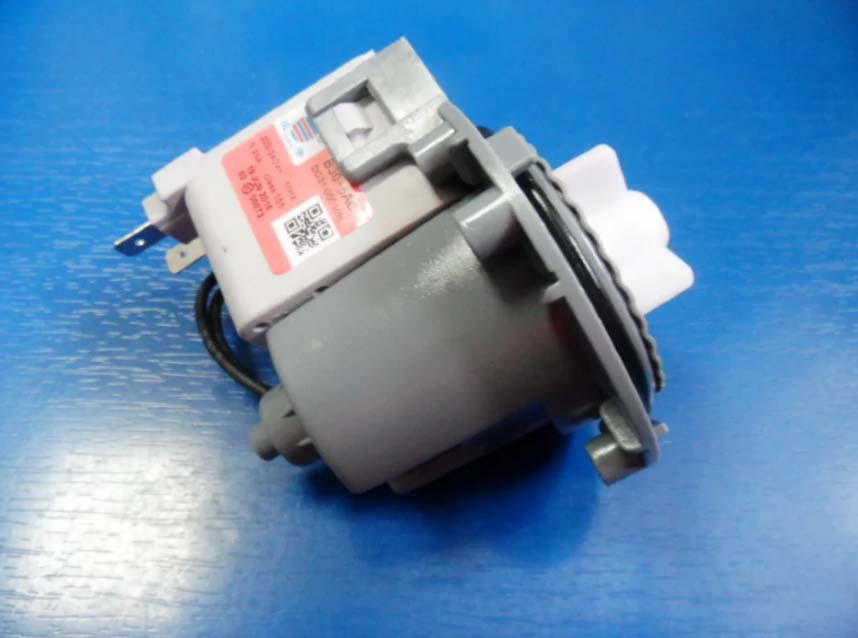
Problems with drain pumps rarely occur. Durability is determined by the specific design of this element. A breakdown can occur due to a failure of the drainage path - it becomes clogged and the pump cannot fully function. This breakdown manifests itself in the inability to drain water automatically. In this case, the error code “OE” appears on the display.
Washing machine drain pump
Breakage can also occur with a part such as the filler valve cuff. Problems with this element manifest themselves in the constant supply of water to the washing machine tank.This happens even when it is turned off. The main way to check for a malfunction with this part is to listen; if there is a gurgle of water and the machine is turned off, then with a 95% probability it is the fill valve that is damaged.
It must be remembered that when performing diagnostics yourself, you should not just disassemble the elements, but also conduct a visual inspection, taking into account the relationship between the parameters specified on the display and those obtained after the completion of the washing cycle. You need to look at the quality of washing, spinning and rinsing, as well as draining water, since all these parameters are a single whole for the high-quality and complete operation of the washing machine.
Failures can also occur in such units and parts as:
- Electric door lock.
- Temperature sensor.
- Electric motor.
- RPM sensor.
- Seals.
If the machine has drying and steaming functions, then the following possible breakdowns are added:
- Steam generator failure.
- Air heater failure.
- Fan malfunction.
- Worn air temperature sensor.
When making the first diagnosis, you need to pay attention to the quality of drying the laundry.
Basic faults
Repair of LG washing machines begins with identifying possible faults. They occur even if the device is used carefully, so the average user needs to know them. Many breakdowns are displayed directly on the built-in displays. Malfunctions are grouped into codes, the explanation of which is included in the technical documentation.
In 90% of cases you can see the following fault codes:
- FE - indicates problems with water drainage. A possible cause of the breakdown is failure of the electrical controller or drain pump.
- IE – the code appears when the water fill level sensor is damaged. In this case, there is a slight filling. Possible causes include a failed fill valve or low water pressure in the pipes. Please note that if there is a complete absence of water, a sound warning about the problem is added to the code on the display.
- OE is an error code that indicates that an excessive amount of water is entering the machine. The cause may be a malfunction of the pump or the electrical controller of the device.
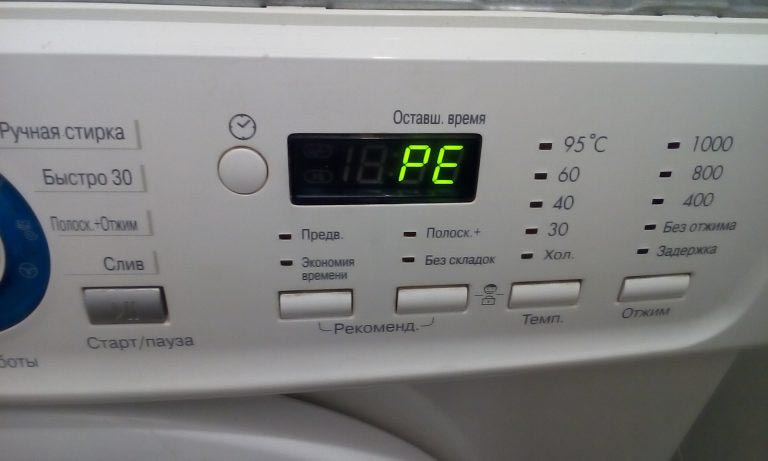
- PE - the code that appears on the display is also associated with water. It indicates a deviation from the norm in its quantity. The cause may be a faulty pressure switch, as well as changes in liquid pressure in the pipes. It must be eliminated, as interruptions can lead to a short circuit.
- DE - this code appears when the hatch door is not completely closed. The reason is an excessive amount of loaded laundry or a malfunction in the sensor.
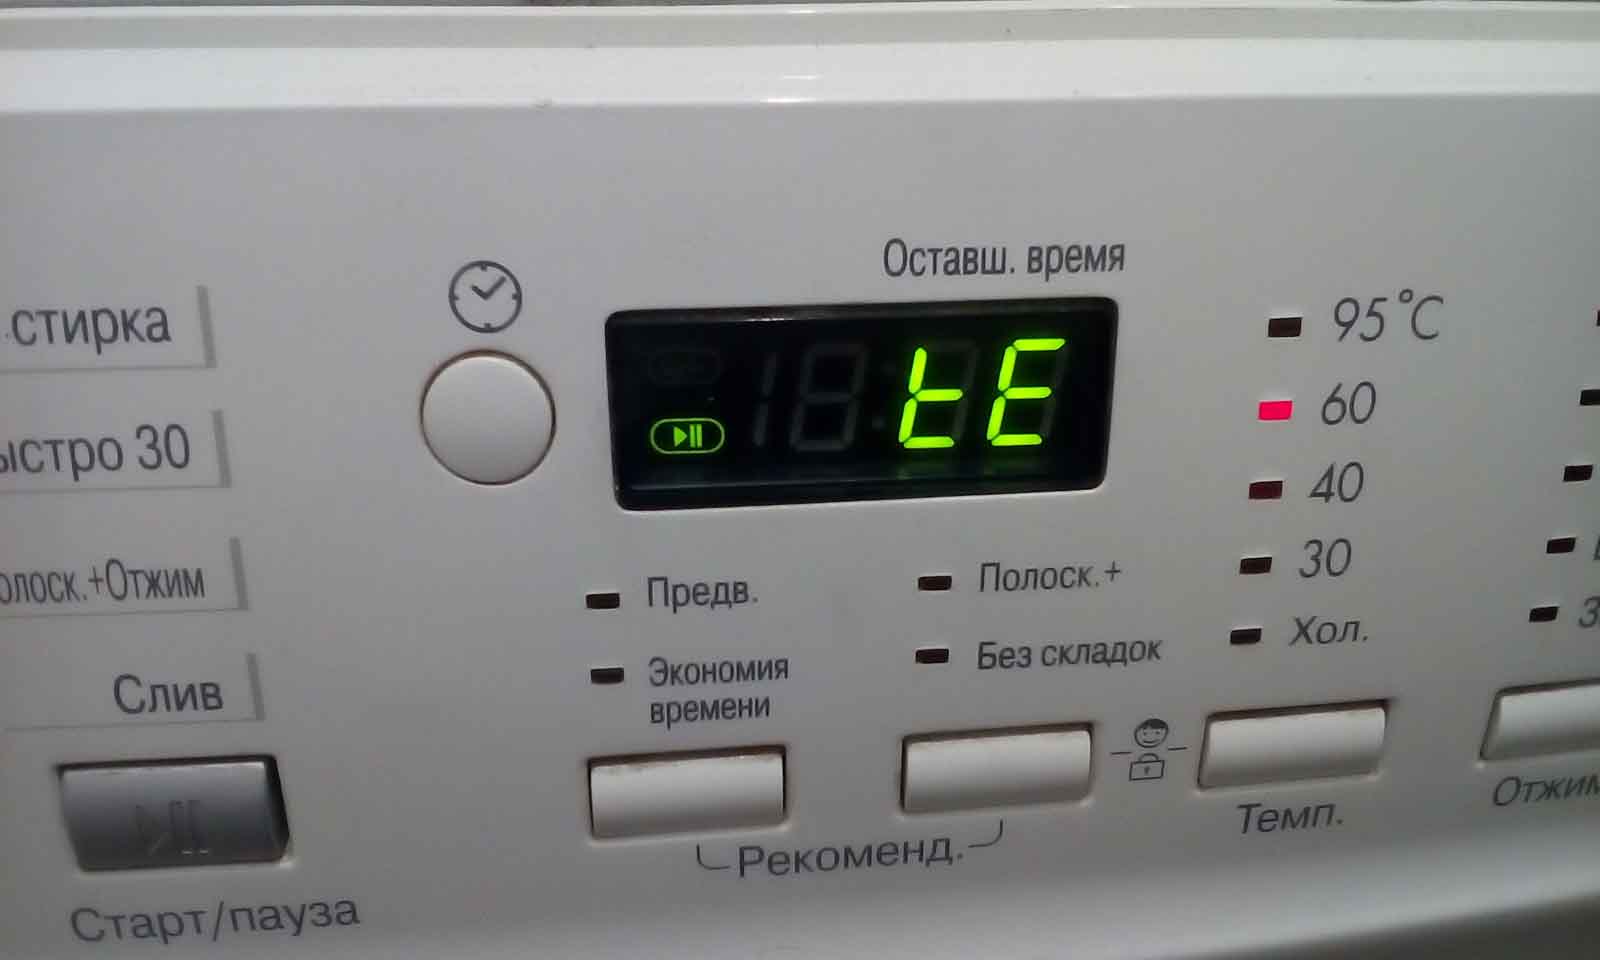
- TE is an error code indicating problems with the sensors. The malfunction occurs when the water is not heated to the required temperature (set by the program). If the water remains cold, the main reason is a broken heating element.
- SE - the problem is related to a non-working electric motor. Feature - breakdown can only occur in those washing machines that have direct drive. In this case, the engine remains blocked even if the failure occurs only in the sensor.
- EE - an error code always appears the first time you turn on a new washing machine. Associated with service tests and should not appear during subsequent startups.
- CE is a code that indicates an overload of the tank, an excessive amount of laundry. The weight is controlled by a special fuse and if the norm is exceeded, this code appears on the display. As a result of the fuses tripping, the rotation of the drum is blocked by the sensor. In this case, repair work is very simple - you should reduce the weight of the laundry.
- AE - indicates improper use, violation of operating rules and regulations, which are accompanied by frequent automatic shutdowns of the washing machine.
- E1 - the code is displayed on the display when the sensors signal that a leak has been detected.
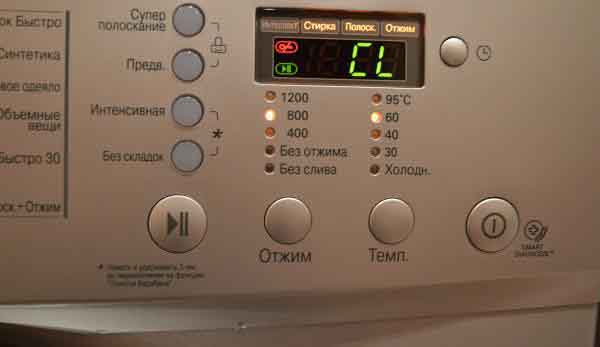
- CL is a special blocking code. It prevents children from pressing the buttons. Unlocking is simple - just press a special combination of buttons.
Up to 90% of all possible malfunctions and breakdowns can be repaired independently without contacting service centers or workshops. To do this, you need to know how the fault codes that appear on the display are deciphered. If the measures taken to restore functionality have not led to a positive result, you need to seek qualified help from specialists who will carry out a full diagnosis of the machine.
Troubleshooting the heating element
If the cause of the breakdown is the failure of the heating element, then you can carry out repair work on your own. To do this, you will need to carefully unscrew several fasteners that secure and hold the back wall of the washing machine. Afterwards it is dismantled. The lower part of the tank is located near the bottom - two paired contacts should stick out from it, and a screw is located in the middle.Several more small wires are connected to this node - this will be the heating element.
The next troubleshooting step is to check the contacts using a multimeter. A malfunction of the heating element will be confirmed if the device readings are less than 20 ohms.

In order to remove the heating element (heater), you will need to perform the following steps:
- Unscrew the screw.
- Pry off the rubber seal.
- Retrieve element.
If it is faulty, characteristic damage will be noticeable - in most cases there will be smoke. The cause of the breakdown is the presence of a layer of scale, the ingress of water or a voltage drop.
It is important to remember that repairs are carried out only by completely replacing the element - it will not be possible to change a certain part of it. To eliminate the malfunction, you need to purchase an original part and install it in the reverse order of removal. In order for the rubber seal to fit securely, you need to lubricate it with machine oil. If it is not located tightly, then with a high probability water will get onto the contacts of the heating element, which will again cause its failure.
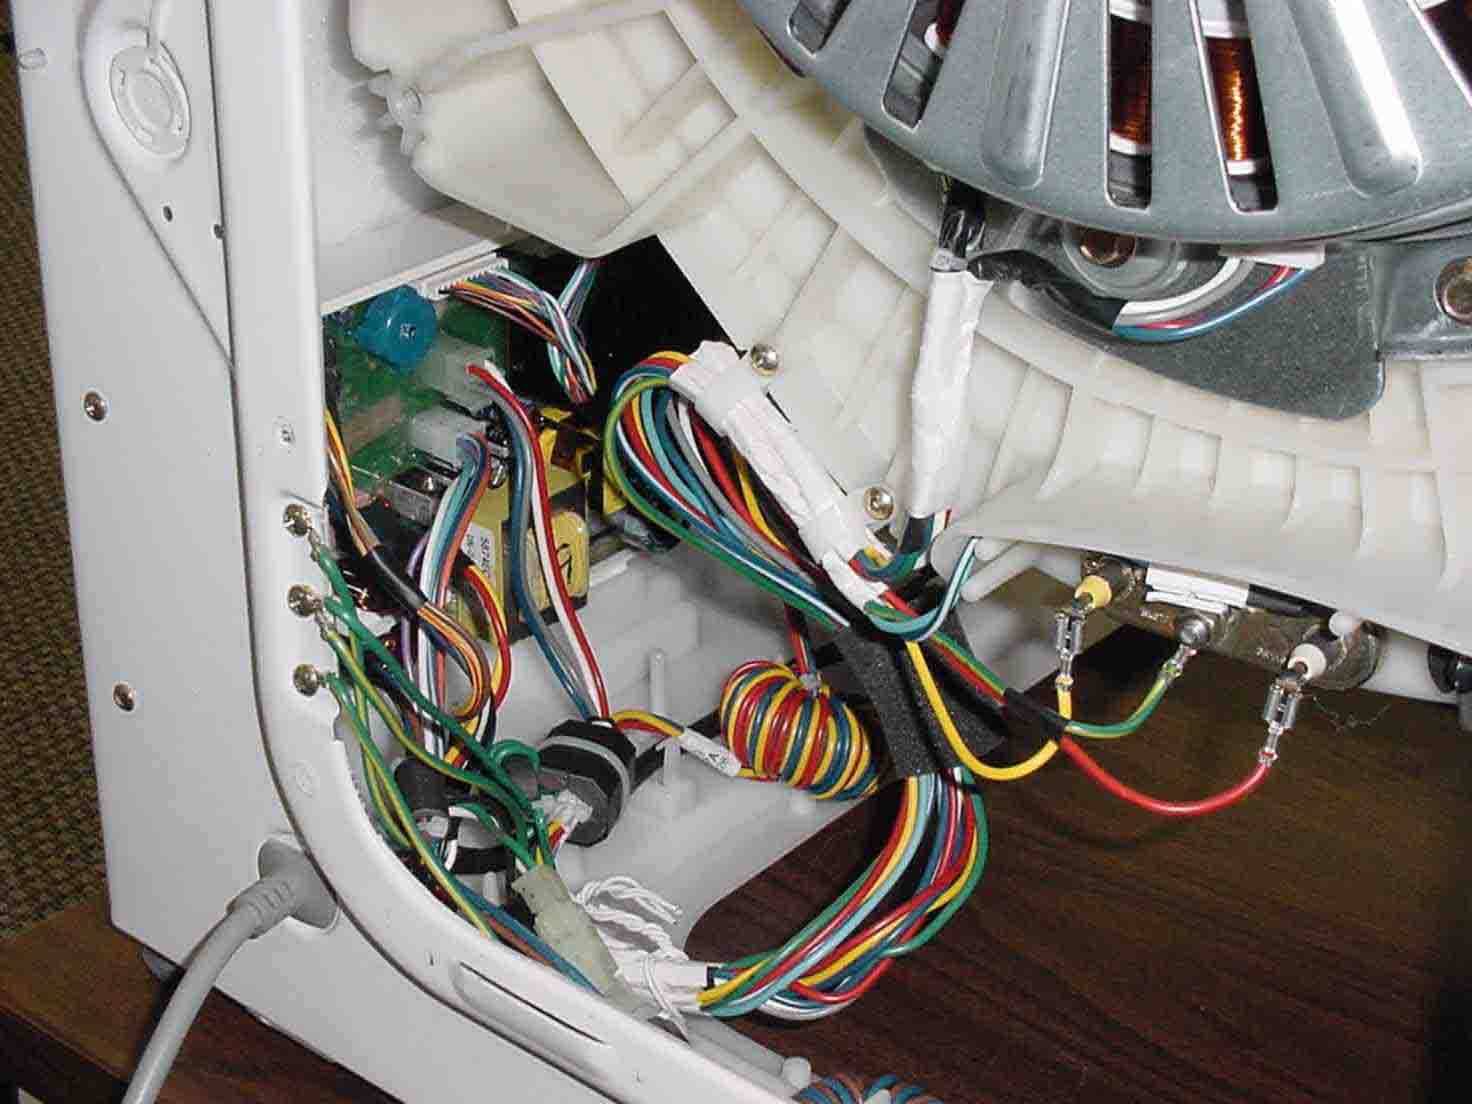
Electrics
Carrying out electrical repairs yourself without sufficient knowledge is difficult. The main actions in this case come down to checking all the wires and terminals present in the assembly, going from the control module to all elements, parts and assemblies.
The test is carried out using a multimeter - this way you can find out basic information about the condition of a particular device. It is also necessary to carry out visual inspection. It will help you find torn clamps, fragments of wires that are without insulation, the presence of burning and melted contacts.All wiring problems can be resolved by replacing faulty conductors or terminals.
Repair of fill elements, water drainage
In some cases, items such as a fill valve, drain pump or pressure switch must be repaired. If the fill valve fails, then to dismantle and replace the part you need to do the following:
- The washing machine needs to be turned around.
- Turn off the tap so that no water flows.
- Turn off the water supply to the machine.
- Disconnect the inlet hose from the machine.
- Pull it out and check visually.
- Clean the fill valve filter as it may be clogged with dust or dirt.
If the reason is contamination, then the filter is replaced and the fill valve is subsequently installed in place. In the case when there are no problems with the filter, you need to:
- Remove the top cover of the washing machine.
- Remove the 2 screws that hold the valve in place.
- Disconnect it from the pipes.
- Check the condition of the rubber seals.
- Replace them if necessary.
If the rubber bands are in good condition and there is no need to change the filter, then the problem is caused by a faulty electrical system. In 90% of cases the valve will have to be replaced completely.
In order to get to the drain pump, you will need to tilt the machine on its side and get to the part through the bottom. The next step is to check the functionality using a multimeter. If the readings are normal, then you need to do the following:
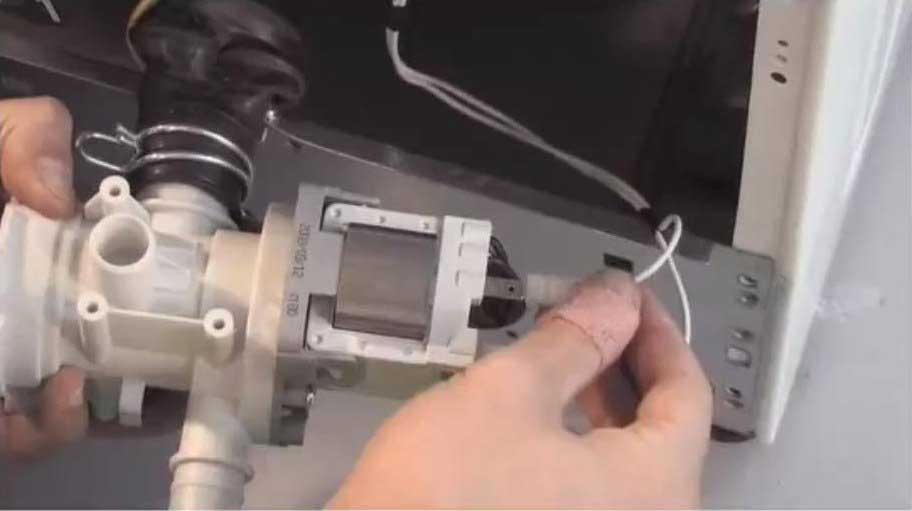
- Remove the lower part of the front panel of the washing machine.
- Unscrew the fixing elements that hold the drain pump.
- Drain the water in a separate container.
- Disconnect all plugs.
- Remove the wires with the sensor.
- Disconnect the pipes.
It is important to remember that before laying the machine on its side, you need to remove the containers for powder and other detergents. This is necessary to prevent water from spilling on the control unit and damaging the electronics.
Only a specialist can determine the exact causes of a malfunction in the drain pump, so it is best to take the part to a workshop for diagnostics. Assembly (existing or new) of the pump is carried out in the reverse order.
Causes of failure and repair of bearings
Malfunctions of LG washing machines can be associated with bearing failure. This occurs for two reasons - natural wear, since they experience heavy loads during machine operation, are constantly in motion when the program is running, or a factory defect. If such a breakdown occurs, then it must be eliminated without delay, since the elements attached to the bearings can damage the tank.
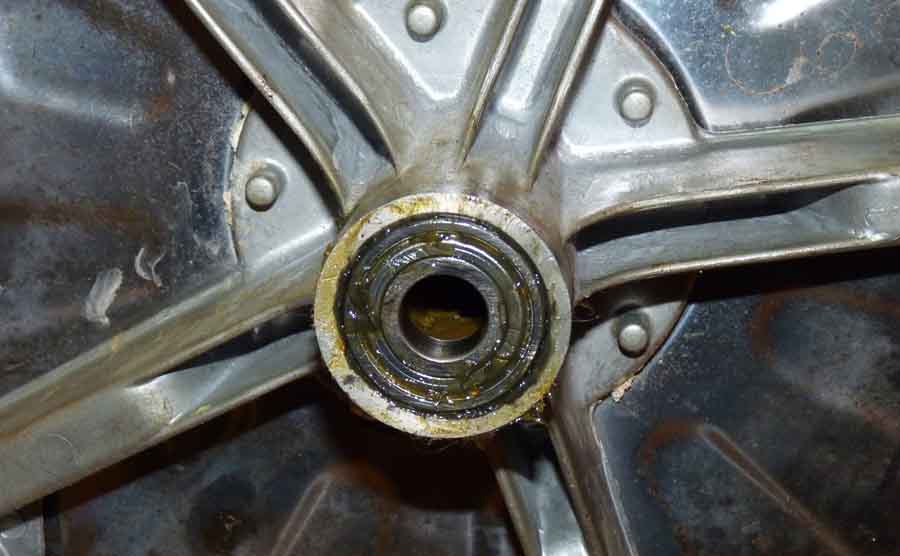
Since in 90% of cases, the washing machines of this manufacturer have a direct drive technology, the bearings, motor, and pulley last longer. In case of DIY repair, the first thing you need to do before removing the bearings is to disassemble the tank and, if necessary, remove the belt drive. Next, you will need to remove the clamp, which is located next to the spring - it should be hooked to remove the clamp. Only after this is the front panel removed. It is important to remember that repair work must be carried out carefully, using a special hammer for this purpose, which is equipped with a bronze striking part and has a thin metal rod. The peculiarities of removing bearings are striking its opposite edges.It is important to remember that before putting the machine on its side, you need to remove the containers for powder and other detergents. This is necessary to prevent water from spilling onto the control unit and damaging the electronics.
Only a specialist can determine the exact causes of a malfunction in the drain pump, so it is best to take the part to a workshop for diagnostics. Reassembling the (existing or new) pump is carried out in the reverse order.
Causes of bearing failure and repair
Malfunctions of LG washing machines may be associated with broken bearings. This happens for two reasons - natural wear and tear, as they experience heavy loads during operation of the machine, are constantly in motion when programs are running, or are factory defective. If such a breakdown occurs, it must be repaired without delay, since the elements attached to the bearings can damage the tank.
Since in 90% of cases, washing devices from this manufacturer have implemented direct drive technology, the bearings, motor, and pulley last longer. In case of DIY repair, the first thing you need to do before removing the bearings is to disassemble the tank and, if necessary, remove the belt drive. Next, you will need to remove the clamp, which is located next to the spring - it should be picked up to remove the clamp. Only after this is the front panel removed.
- It is important to remember that repair work must be carried out carefully, using a special hammer for this purpose, which is equipped with a bronze striking part and has a thin metal rod. Features of removing bearings are striking on its opposite edges.To do this, you first need to place the rod on one side of the bearing and hit it with a small force. This action is repeated until the old bearing pops out. Then you can put a new element in its place.
- Electrics: tips and tricks
- Wiring is an important element in any device. It is very difficult to carry out diagnostic measures on your own, but if you suspect a problem, it is important to take all necessary actions to eliminate the breakdown. It is the wiring that is responsible for the performance of 90% of the elements in the unit. Contact failures lead to a variety of consequences, including the possibility of fire.
- The most important tip to remember is that if there is any doubt about which element has failed, the electrical is checked first. You should follow the rules of safe work:
- Before performing any diagnostic or repair actions, it is necessary to de-energize the device - remove the electrical plug from the outlet.
- Then you need to open the top and bottom covers.
If there are problems with draining water, you will also need to remove the plastic panel.
- A visual inspection and control of electrical elements is carried out - the terminals in working condition should be clean and shiny.
- The wires must have insulation without damage. Its color is bright and uniform.
- Do not allow water to be present on wires and contacts.
- Wiring problems include the following:
Presence of oxidized contacts (plaque color white, green).
White or dark insulation.
Insulation that has lost its integrity (presence of cracks, burnt areas, collapsed areas).
Wet contacts.
If even a small amount of water comes into contact with the contacts, they must be wiped or dried immediately. The next step is to fix the leaks. Oxidized terminals must be thoroughly cleaned. Additionally, you will need to look for a possible leak location to prevent oxidation from happening again.
If darkening occurs on the wires, then this is a sign of overheating (the brighter they are, the stronger the heating). The main cause of the problem lies in poor contact. In order to avoid breakage, it is required that the insulation be intact, as well as the clamps that secure all the wires.
Oxidized contacts also need to be thoroughly cleaned. It is recommended to find the opposite end of the problem wire and replace it entirely. The work should be carried out using a soldering iron with a power of 60 watts. A temporary measure is allowed - cleaning the contact and then inspecting it after 1-2 weeks.


