 During prolonged operation of the washing machine, situations may inevitably arise involving damage to one or another component. Therefore, you should not be surprised that the most common failure may be the failure of the cuff in this unit. The most typical failure may be a break in the sealing rubber installed on the hatch of the machine. In this article we will consider the question of how to replace the cuff of the washing machine hatch with your own hands.
Causes of damage
If we take a closer look at what the possible causes of damage to this sealing rubber may be, it is worth noting that experts identify a number of the most common factors:
- For example, if the machine is in the process of long-term operation, then such damage may occur. This is due to the fact that with prolonged use of the washing machine, its elements wear out and their safety margin comes to an end.
- The hatch cuff is made on a rubber basis. Such material may become unsuitable for further use if a number of detergents are used during the washing process. It is they, when added to water, that can lead to premature destruction of rubber, which will require replacement of this part.
- When a washing machine performs laundry washing operations, there is a possibility of contact between internal structural elements located nearby. To put it more simply, a friction process occurs. If this is repeated regularly, the rubber wears out and holes appear in the cuff.
- There is a possibility that the friction process may also occur when it comes into contact with hard parts of the clothes being washed. For example, this could be shoes and clothing, where metal components are used during manufacturing.
- There is a possibility that fungus will form on the surface of the rubber part. It is this that can degrade the quality of the product over time.
- The owner of the machine himself can damage the rubber seal if he carelessly carries out processes related to loading or unloading laundry.
Removing the cuff from the washing mashine hatch
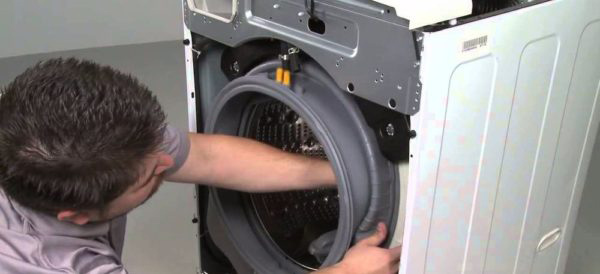
There are a number of washing machine models in which the manufacturer provides Possibility of self-removal of the rubber band. In this case, there is no need to dismantle part of the washing machine body. In other cases, it is necessary to remove the front part of the wall to carry out such work.
Replacing the cuff of the washing machine hatch does not require special skills. Everything is done quite simply with your own hands. When performing this type of work, you must remember to be careful. This especially applies to mounting a new part.
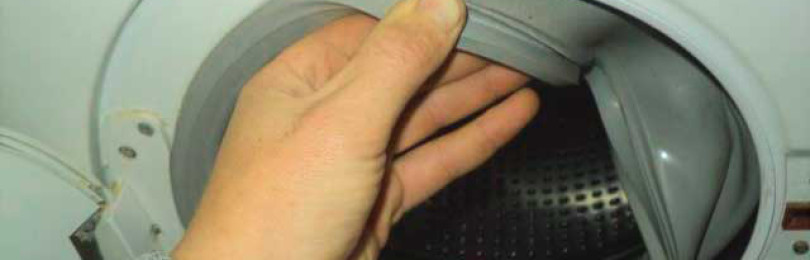
After checking this fact, you can begin dismantling the rubber part. Initially, you should remove the clamps that perform the fixation.It must be remembered that the outer part of such a cuff is recessed into a special opening located in the outer wall of the washing machine body. It is there that it is fixed with a clamp. This clamp is made either of plastic or on a metal base in the form of wire.
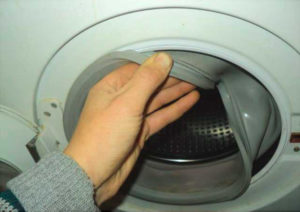
To remove a clamp made of plastic, take the part where there are latch connections. Then you need to pull them in your direction.
If it is necessary to carry out the procedure for removing a clamp made from wire, then it is necessary to unscrew the screw. There is also an option in which you need to pry the spring with something that has a flat shape.
After this, you should search for the mark that is on the rubber band being dismantled. It is with the help of such a mark that the required location of the elastic band itself in relation to the washing machine tank is noted. If the installation is carried out correctly, then we can talk about eliminating the possibility of leakage during operating the washing machine.
Now the clamp is removed and the sealing rubber is removed.
Installation of a new cuff
- Initially, you should prepare the place where you intend to replace the part. Therefore, the surface should be cleaned of dirt.
- Next, it is recommended to first apply a solution of water and soap to the installation site of the new cuff. This will make the surface somewhat slippery. Then installing a new part will become much easier.
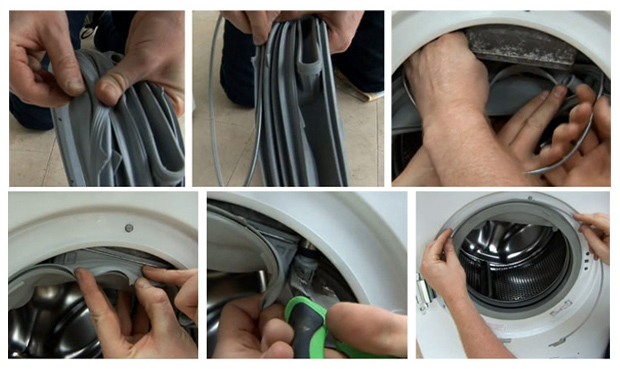
- Now you need to put the new cuff on the washing machine tank. This process may seem complicated.Here it is necessary to remember that there is an upper position of the hatch cuff in relation to the tank itself. Therefore, you need to keep an eye on the marks.
- We combine the marks on the tank and the rubber part and install the cuff recess on the tank itself. For this purpose, from the inside, using the thumbs, we pull the elastic band in a circle. Thus, the process should be easy since the edge was initially prepared with soapy water.
- Now we sequentially put on the inner and outer clamps. When adjusting the internal clamp with a screw, loosen it to the required diameter.
- Now we install the clamp on the sealing rubber itself and fix it by tightening the screw. When using a clamp with a spring, the process takes a little longer. First, it is secured at the point of initial tension.
- For final fixation, use a screwdriver inserted all the way into the locking opening. Now the spring is put on and by pulling it back you can put the clamp itself in its place.
- In machines that were purchased a long time ago, round nose pliers should be used to fix the clamp.
Thus, the procedure for replacing the cuff on the washing machine will be carried out correctly and the washing machine will last for a very long time.


