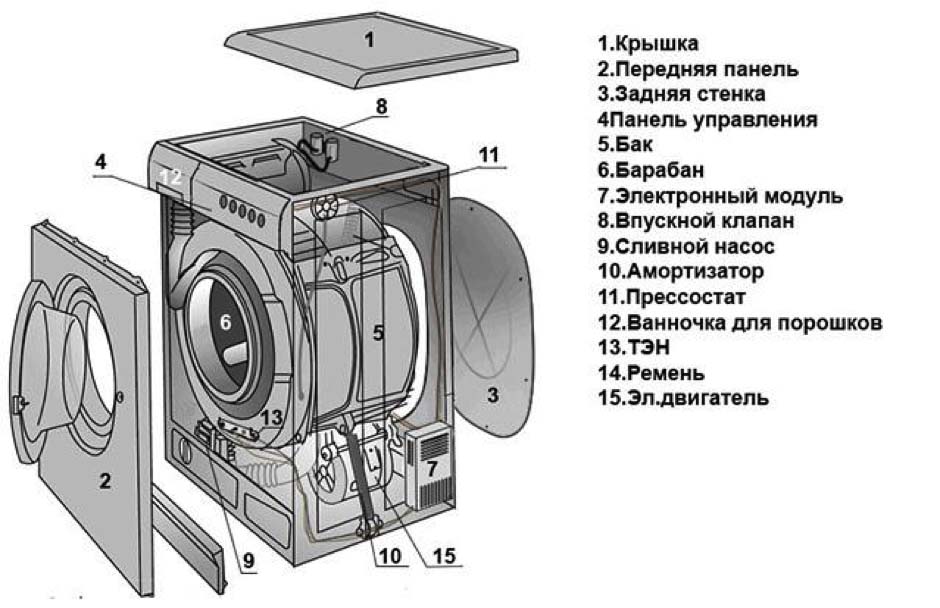
 Indesit washing machines, like other washing equipment, can have various types of breakdowns. Then the question arises of how to fix such problems. To do this, you first need to figure out how to disassemble an Indesit washing machine with your own hands. Otherwise, you should seek help from specialists who can provide such services for a fee.
What is needed to disassemble the machine
Units of this class quite often resemble washing machines manufactured under the Ariston trademark. However, there is also a difference between the two brands. It lies in a number of details, without knowing which you can simply completely disable the unit.
Initially, you need to select the tools that will be needed during such a procedure as disassembling a washing machine .

In order to disassemble an Indesit washing machine, you do not need to prepare a large set of tools.It is enough to limit yourself to the minimum set:
- It is necessary to prepare open-end wrenches with dimensions ranging from 8 to 18 millimeters.
- It is required to have a set of knobs and heads available.
- You will also need ordinary pliers to disassemble the washing machine.
- Additionally, you should prepare screwdrivers that have a wide variety of configurations and sizes.
- Experts recommend preparing a set of socket-type wrenches, which will be useful when disassembling the machine.
- A multimeter is a must-have device in this process.
- A regular hammer is also required.
- By the way, you will also need a hacksaw designed for working with metal.
- To make work easier when disassembling the machine, it is recommended to prepare a set of markers of different colors in advance.
- It wouldn’t be superfluous to have a device like an awl.
Initial stage of work
It is necessary to prepare a special workplace for this. You should choose it, remembering that during the disassembly process you will need space for laying out the components of the unit. This will allow you not to lose parts and assemble the washing mashine completely complete. Ideal from this point of view would be a workshop or your own garage, where there is enough space. If there is no such room, the washing mashine will have to be dismantled in a very ordinary apartment. At the same time, you need to take care of the workplace for such a process.
- It is necessary to create a free area measuring two by two meters. In this case, the floor must be free of carpeting and household furniture.
- Lay rags or newspapers over this area.
- Next, you need to disconnect the unit from the power supply and move it to the place where you intend to disassemble the washing machine.
- Now the cuvette is removed, intended for washing powder, and is put away in a prepared place.
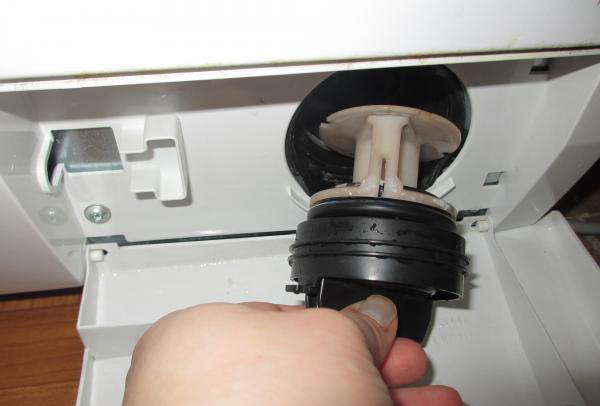
- Next, you actually need to unscrew the filter designed to retain debris and drain the remaining water from the tank of the machine. Naturally, the filter is also placed in the designated place.
Disassembling the machine
Once everything is prepared, you can begin disassembling the machine:
- First, we dismantle the upper component of its body in the form of a cover. So at the back there are two screws on the right side. Use a Phillips screwdriver to unscrew them. Then we move the lid towards ourselves and slowly lift it up.
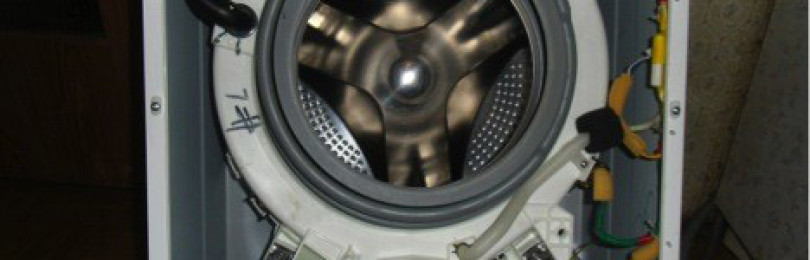
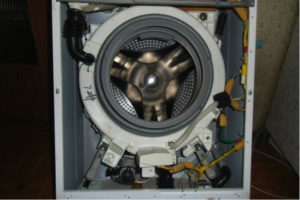
- Now you can remove the cover installed on the service-type hatch. It can be found at the back of the washing mashine. To dismantle it, you must first unscrew the six screws holding the hatch. After this, we get full access to a number of parts of the unit and this must be taken advantage of.
- We remove the belt installed on the pulley. For this purpose, we reach the drum pulley with our hand. With the other we hold onto the belt and turn the pulley until the belt comes off it.
- Next, remove the wires from the contacts located in the heating element and temperature sensor. After this, you can unscrew the central nut and dismantle the heating element. In this case, you can leave it in the tank itself for now. Then when disassembling you should be extremely careful so as not to break off the protruding contacts.
- Now you can remove the wires with chips applied to them from the motor of the household appliance. For this we use a 10 mm wrench or a similar socket type wrench.Then you can unscrew a couple of bolts holding the engine. The dismantling of the engine is completed and it should be put aside.
- On the upper part near the tank, three counterweights are bolted. We use the same socket wrench and unscrew these bolts by hand. After this, we move these counterweights and set them aside.
- The tank is almost empty. It is necessary to remove the panel designed to control the machine. We unscrew the fastening elements that are located near the niche of the powder receiver itself. Next, unscrew the screw from the housing located on the left front. The panel remains on the latches. We pull it up and it comes off. It is necessary not to pull it sharply in order to leave the wires intact.
- We dismantle the wires going to the intake valve and set the panel aside so that it can hang on those wires that remain.
- Let's move on to the cuff, which for the hatch is a large elastic band installed using a clamp. You need to remove it so as not to damage the cuffs.. To do this, use a flat-type screwdriver to hook the clamp and go in a circle. Along the way we find a fastening and twist it. Then we remove the clamp itself and tuck the cuff much deeper into the body of the unit.
- We go to the back of the washing mashine, and where the intake valve connects to the unit, remove the screw. Now you can pull out this valve at the same time as the niche for the powder receiver.
- We take out the water sensor, removing the wires. Be careful not to damage the fastenings.
- We shift the unit onto the left side and gain access to the racks and drain pipe. They must be removed so that the tank can be dismantled later.
- We remove a couple of clamps and dismantle the pipe.
- Use a 10 mm socket wrench to tighten the screws and remove the racks.
- We return the washing mashine to the reverse position.
Disassembling the tank
Now we have to dismantle the tank. This component of this machine model is non-separable. However for bearing replacement it needs to be removed. In this situation, it is recommended to seek help, since it is not easy and inconvenient to remove it alone.
- You need to pull the tank off the springs and very carefully lift it up, carefully removing it from the body. Here you need to be careful not to damage the wires with the cuff.
- After removal, install the tank in a vertical position. This is necessary so that the soldering seam is at the top.
- Now we use a hacksaw to cut it along this seam. This must be done very carefully, since during assembly they will need to be sealed with sealant and connected with bolts. In this case, the cutting process can last up to six hours.
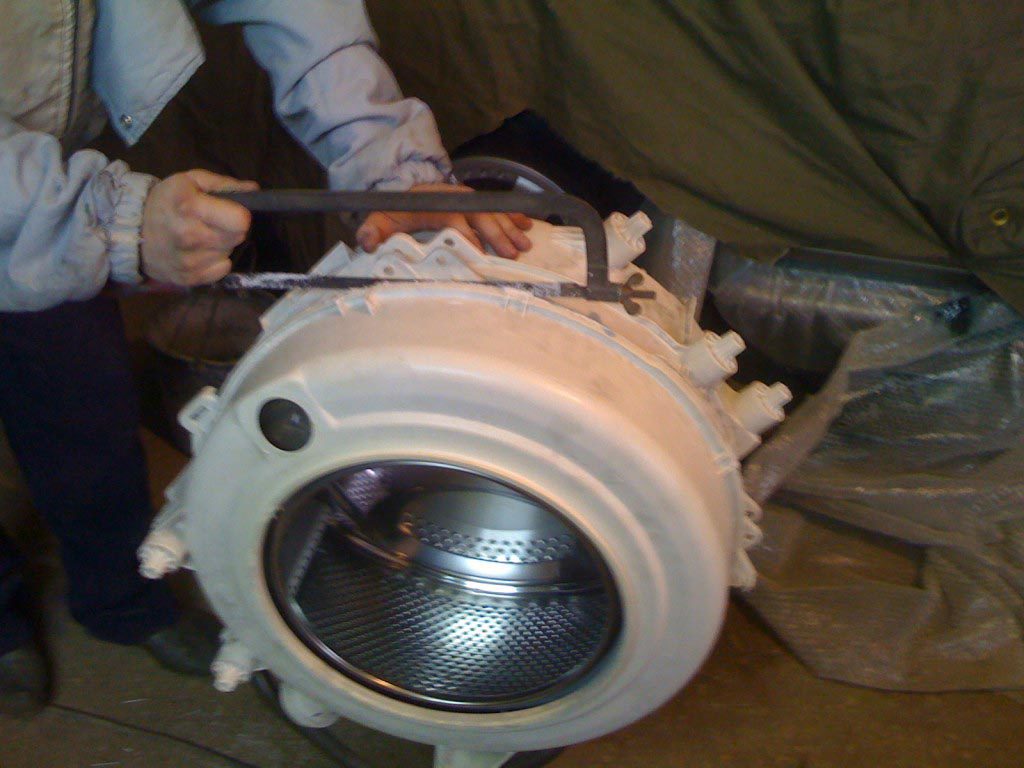
- Next, we remove the front part of the tank to the side, and leave the rear part on the drum shaft, where there are bearings. It is necessary to dismantle this part of the tank.
- Unscrew the pulley nut and remove it from the machine shaft.
- Now we take a bolt with a diameter similar to the one that was removed and screw it into the hole. After this, we lean a piece of wood against the bolt and hit it with a hammer. It is necessary to hit with force so that this half of the tank can be dismantled.
- After dismantling half of the tank, a drum remains on the shaft, where bearings and seals are installed. There are a couple of options for removal. For example, we take out an automobile-type puller and remove the bearings by hand. You can also bring it to the workshop and pay money to ask a specialist to dismantle the bearings.
- Now you can independently press pre-selected bearings onto this shaft. Then we assemble the washing machine and tank in the reverse order described earlier.


